Isn’t it ironic that one tiny driver error can bring your whole day to a halt? You’re not alone. The 0xC1900101 error in Windows 10 has been causing headaches for many.
But don’t worry; we’ve got your back. In this article, you’ll discover 12 fixes that will quickly get you back on track.
So, let’s roll up our sleeves and tackle this pesky problem together.
12 Fixes for 0xc1900101 Driver Errors in Windows 10
You’ve encountered the 0xC1900101 driver error in Windows 10, right? Let’s dive into some fixes to help you tackle this issue.
First off, try updating your drivers. An outdated one may be causing the nuisance. You can do this manually, by visiting the manufacturer’s website and downloading the latest driver. Or, opt for the automatic approach, using Windows Update.
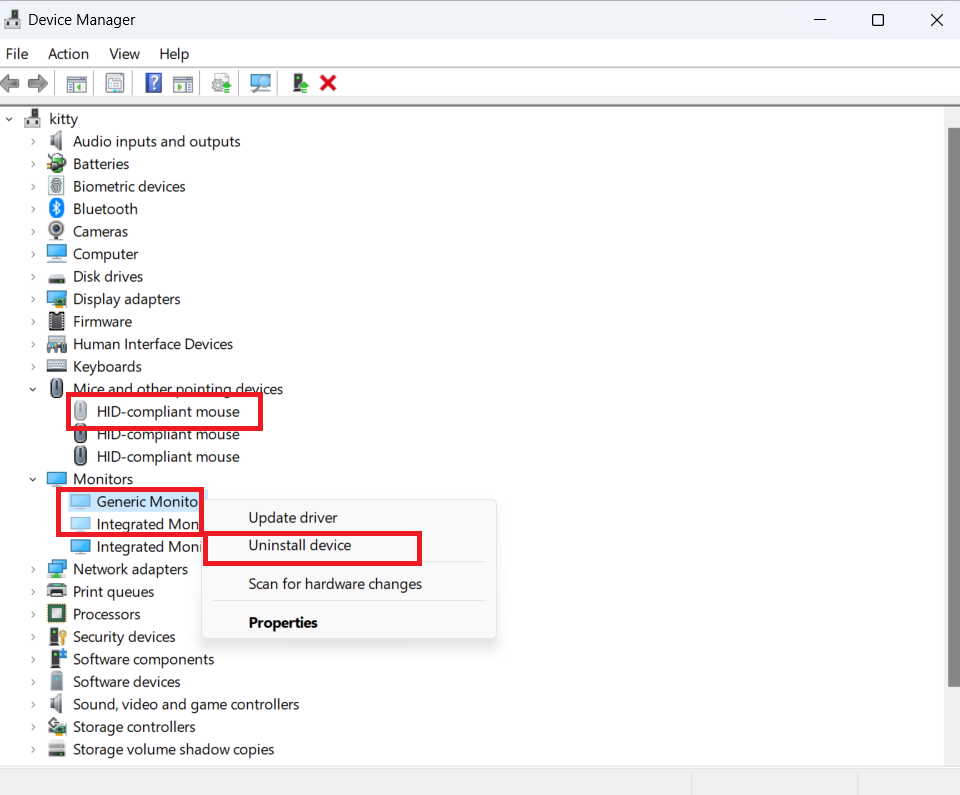
However, if you’re still stuck, don’t worry, there’s more you can do. Uninstalling the problematic driver is another solid approach. To do this, navigate to Device Manager, locate the driver, and select ‘Uninstall Device’. Afterward, restart your PC and Windows will automatically install the correct driver.
Lastly, a System Restore might be your saving grace if nothing else works. This turns your system back to a point before the error occurs, effectively erasing it. Remember, though, this should be your last resort.
Reasons Behind 0xc1900101 Windows 10 Error
There’re several reasons why the 0xc1900101 error might pop up in Windows 10, including outdated software or hardware incompatibility. This error typically signifies a driver issue preventing a successful system update. It could be a problem with your system’s BIOS, a corrupt system file, or even a faulty hardware component.
To create a visual, here’s a table that outlines some common causes:
| Cause | Explanation | Example |
| Outdated Software | Older, incompatible software can prevent updates | Out-of-date antivirus software |
| Hardware Incompatibility | Some hardware components might not work with the latest updates | An old printer |
| Corrupted System Files | Damaged files can cause update failures | A corrupt Windows registry |
| BIOS Issues | An outdated or misconfigured BIOS can prevent system updates | An old motherboard BIOS |
Understanding the root cause is crucial. But don’t worry, each cause has a corresponding solution. You’re not alone in this; many resources and methods are available to help you navigate this issue. Now that you have a basic understanding of why this error might be occurring, let’s move on to explore 12 different methods you can use to troubleshoot and resolve the 0xc1900101 error.
How to Fix the Windows Update Error 0xc1900101: 12 Methods
Let’s dive into 12 different strategies to tackle the update issue labeled 0xC1900101. You won’t have to try them all, just work your way down until you find the one that does the trick.
First and foremost, ensure that your operating system is up-to-date. Regularly updating your Windows can help you avoid many issues, including this error.
Secondly, disconnect unnecessary hardware. Sometimes, the error can be caused by a peripheral device not needed during the update.
Thirdly, disable antivirus software. Although this software is important to protect your PC from malware, it can sometimes interfere with updates.
Fourthly, repair hard drive errors. Windows has a built-in tool that can help you with this.
Fifthly, perform a clean boot. This involves starting Windows with a minimal set of drivers and startup programs.
Moving on, you could also try resetting the Windows Update components, or even running the Windows Update Troubleshooter. Remember, it’s all about trial and error. Don’t get discouraged if the first few methods don’t work. Persistence is key here.
Having covered these initial strategies, you’re ready to delve into more specific solutions, such as updating or uninstalling corrupt drivers.
Update or Uninstall Corrupt Drivers

It’s essential to address any faulty or outdated software on your system, as they could be the source of your update issues. Outdated drivers can lead to many problems, including the dreaded 0xC1900101 error. Luckily, updating or uninstalling these problematic drivers isn’t as daunting as it might seem.
To start, you must identify which drivers are causing the issue. You could get this information from the error message or use a reliable third-party software to scan your system. Once you’ve singled out the faulty drivers, you can update or uninstall them.
Here’s a quick rundown of how you can do this:
– Open Device Manager from your Windows Start menu.
– Expand the category with the device you want to update.
– Right-click on the device and select ‘Update driver’.
– If an updated driver is unavailable or the issue persists, choose ‘Uninstall device’.
– Restart your system for the changes to take effect.
Like that, you’re one step closer to resolving the 0xC1900101 error. But hold on, there’s another potential culprit you need to check – third-party antivirus software. Let’s dive into that next.
Remove Third-party Antivirus Software

Sometimes, third-party antivirus software can interfere with system updates, so you might consider removing them temporarily. They’re designed to protect your computer from external threats, but they can sometimes be overzealous and block legitimate updates from installing properly. It’s a bit like having a guard dog that’s so protective, it won’t let your friends in the house.
Don’t worry, you’re not leaving your system vulnerable by doing this. Windows 10 has built-in antivirus software, Windows Defender, which should keep you safe. It’s also worth noting that you’re not uninstalling your third-party antivirus for good, you’re just disabling it for a short while so you can get those updates installed.
Once you’ve disabled your antivirus, try running the update again. If it works this time, you’ll know the antivirus was the culprit. You can then re-enable it once the update is complete. If the update still doesn’t work, it’s time to try something else.
At this point, you might find unplugging all peripheral devices from your computer beneficial. This can sometimes help to eliminate any potential conflicts or issues that might be causing the update to fail.
Unplug All Peripheral Devices

Unplugging all peripheral devices can often help eliminate potential conflicts that might be causing system updates to fail. Peripheral devices like printers, external hard drives, or mouse and keyboard can sometimes interfere with system updates. You may not realize it, but these devices constantly communicate with your operating system. This constant chatter can create conflicts that cause system updates to fail.
Let’s look at a simplified example.
| Peripheral Device | Potential Conflict |
| Printer | Driver Incompatibility |
| External Hard Drive | System Resource Conflict |
| Keyboard | Interrupt Request Conflict |
As you can see in the table, each device has a potential conflict that can disrupt a system update. By unplugging these devices, you’re giving your system a clean slate to work with. It’s a simple solution that can often yield significant results.
Now, it’s not always practical to unplug every device. You may need your keyboard and mouse, for instance. In those cases, try to limit the number of devices connected to your system during the update process.
In the next section, we’ll discuss how to run the Windows Update Troubleshooter, another useful tool to fix the 0xc1900101 driver errors.
Run Windows Update Troubleshooter

Now that you’ve unplugged all peripheral devices, it’s time to move on to another effective solution – running the Windows Update Troubleshooter. This tool is ingeniously designed to automatically identify and fix potential issues preventing your system from updating properly.
Here’s how you can run the Windows Update Troubleshooter:
- Press the ‘Windows’ key and type ‘Troubleshoot’ into the search bar.
- Select ‘Troubleshoot settings’ from the results.
- Scroll down and click on ‘Windows Update’.
- Finally, click ‘Run the troubleshooter’ and let the wizard do its magic.
The troubleshooter will scan your system for potential problems and fix them automatically. It might take a few minutes, so be patient. Windows has endowed this tool with the ability to rectify most common issues, including the annoying 0xc1900101 driver error. Remember, it’s important to keep your system updated as it enhances performance and patches security vulnerabilities.
Having run the troubleshooter, let’s delve into a more advanced, yet highly effective approach. In the next section, we’ll perform a ‘check disk’ from the command prompt.
Perform “check Disk” From the Command Prompt

You’re about to learn how to perform a ‘check disk’ from the command prompt, a technique that can help identify and resolve various system issues. This method is simple yet powerful. It’s like a Swiss army knife for your computer, tackling everything from system errors to data corruption.
First, you need to open the command prompt. Type ‘cmd’ into the Windows search bar and right-click on the result, choosing ‘Run as administrator’. You’re in the command prompt, a black window filled with potential.
Type ‘chkdsk /f’ and hit enter. The ‘/f’ part is important; it tells the computer to fix any issues it finds. Wait patiently as your computer does its work. You’ll see a lot of text scrolling by – don’t worry, that’s normal. Once it’s done, it’ll give you a report of what it’s found and fixed.
Remove Additional Ram or Your Network Card
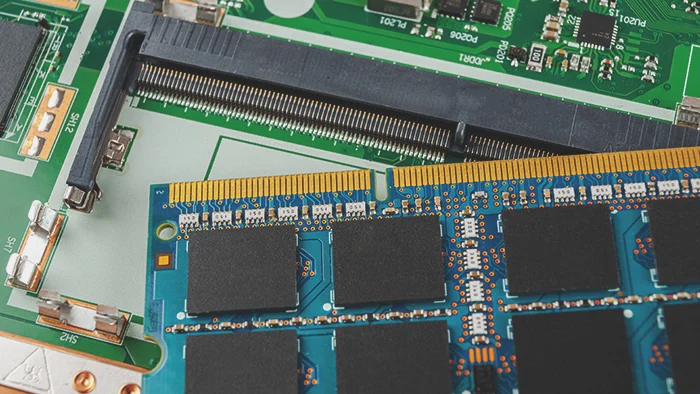
Let’s tackle the next step – removing additional RAM or your network card, which could be causing the system issues.
Begin by powering down your computer and unplugging it from the power source. It’s crucial to avoid any electrical damage during this process.
You’ll need to open up your computer case; this process varies depending on your specific model, so you might need to consult your user manual.
Once you’ve accessed the inside of your computer, you should see your RAM and network card. They’re usually easy to identify – RAM slots look like long, thin rectangles, and your network card might have one or more antennas attached.
Carefully remove these components, making sure not to force anything. If they’re stubborn, there could be a locking mechanism you need to disengage.
After you’ve removed the RAM or network card, power up your computer and check if the error still appears. If it’s gone, your problem was likely with one of these components. If the error persists, you’ll want to replace the components you removed.
As the error emerges, it’s time to delve deeper into the system files, which can be initiated by running an sfc scan.
Run An SFC Scan
Running an SFC scan is the next part of this troubleshooting process, and it’ll help you identify any corrupt or missing system files that could be causing the issue. SFC stands for System File Checker, a built-in Windows tool that can fix potential problems with your system files. It’s an easy tool to use, and it could potentially solve the 0xc1900101 driver error you’re encountering.
To run this scan, you must open your command prompt as an administrator. Type ‘sfc /scannow’ and hit enter. This command will initiate the SFC scan, which might take some time to complete. While it’s running, you should avoid using your computer for other tasks, as this can interfere with the scan.
Once the scan is complete, it’ll provide a report detailing any identified issues and what it did to fix them. If it found and repaired any corrupt files, restart your computer and check if the error has been resolved.
If you’ve carried out this process and the error persists, you may need to examine another aspect of your system. Specifically, it’s time to consider how much free space you have for upgrades.
Check Your Available Upgrade Space

It’s essential to ensure you’ve got enough free space on your hard drive for updates and upgrades. Insufficient disk space can often lead to errors like 0xc1900101 in Windows 10. Here’s how you can check your storage quickly:
- Navigate to your PC settings.
- Click on ‘System’.
- Select ‘Storage’.
- You’ll see a visual representation of your storage usage.
This way, you get a clear picture of what’s eating your storage and how much free space is left. You’ll want to free up some space if your hard drive is near capacity. You can achieve this by deleting unnecessary files, uninstalling unused apps, or moving some data to an external storage device.
Remember, the upgrade process requires not just enough space to download the new files, but also additional room for the installation process. So, make sure you’ve got ample space before initiating an upgrade.
Now that you’ve checked your storage, it might be a good time to look into another possible solution to the 0xc1900101 error – removing third-party applications that might be causing conflicts with your system.
Remove the Third-party Applications

After ensuring you’ve adequate upgrade space, it’s time to consider another possible culprit for the pesky 0xc1900101 driver errors – third-party applications. Sometimes, these applications might interfere with your Windows 10 upgrade process. Let’s dive into how you can remove them.
Here’s a quick guide on how to remove these potentially problematic applications:
| # | Action | Outcome |
| 1 | Identify third-party applications | List of third-party applications |
| 2 | Backup important data | Safety net for important data |
| 3 | Uninstall the applications | Cleaner system |
| 4 | Restart your computer | Applications fully removed |
| 5 | Retry the Windows 10 upgrade process | Check if the error persists |
Firstly, you’ll need to identify the third-party applications on your system. Consider backing up important data before you start the uninstallation process, just to be on the safe side. Next, uninstall these applications and restart your computer to ensure they’re fully removed. Lastly, retry the Windows 10 upgrade process to see if the error persists.
Disable the Lan of Your Bios

Let’s explore how disabling the LAN in your BIOS could resolve the issue. You’re probably wondering, why would this make any difference? Well, it’s all about eliminating potential conflicts. Your BIOS, or Basic Input Output System, controls your computer’s hardware. By disabling the LAN – your local area network connection – in your BIOS, you’re freeing up resources that could be causing the 0xc1900101 driver error.
To evoke an emotional response, consider this:
– Imagine relief when that error message no longer pops up.
– Remember the frustration when it first started?
– Picture the hours wasted trying to resolve it.
– Consider the sense of accomplishment when you’ve fixed it yourself.
– Think back to the confusion of not knowing what to do.
– Visualize the satisfaction of successfully troubleshooting.
– Ponder the newfound knowledge you’ll have.
– Reflect on the uncertainty you felt before.
– Envisage the confidence moving forward.
Doesn’t that sound appealing? Now, hold onto those feelings as we transition into our next topic.
Let’s explore how you can enhance your system by upgrading your BIOS. This could be another potential solution to your ongoing driver error issues.
Upgrading Bios

After effectively disabling your LAN in BIOS, you’re ready to tackle the next part of the process – upgrading your BIOS.
It’s crucial to understand that your computer’s BIOS (Basic Input Output System) is an intermediary between your computer’s hardware and operating system. Thus, an outdated BIOS could be the source of the 0xc1900101 driver errors you’re battling.
Upgrading your BIOS isn’t as daunting as it sounds. First, you’ll need to ascertain the version of BIOS your computer is running. You can do this by accessing the system information on your computer. Then, you’ll need to visit the manufacturer’s website to check for any available BIOS updates compatible with your system. Remember, choosing the correct update is crucial to avoid causing more harm than good.
While the process may vary slightly depending on your computer’s manufacturer, you’ll generally download the file, run it, and follow the on-screen directions. Be sure not to interrupt this process or turn off your computer, as this could cause significant system damage.
Once you’ve successfully upgraded your BIOS, it’s time to see if the issue persists. If it does, don’t fret. There’s another method you can try: resetting your computer.
Resetting Your Computer
You’re now at the stage where you might need to consider resetting your computer to its original settings. It’s a drastic step, but fixing the nagging 0xc1900101 driver error in your Windows 10 system might be necessary. Before you start, ensure you’ve backed up all your important data.
Here’s a simple guide on how to reset your computer:
– First, open the settings on your PC. You can do this by clicking the start button and selecting the settings icon.
– Then, choose the ‘Update & Security’ option.
– Next, on the left pane, select ‘Recovery.’
– Under the ‘Reset this PC’ section, click ‘Get Started.’
– Finally, you can choose to either ‘Keep my files’ or remove everything.
Remember, the ‘Keep my files’ option will only save your files. All apps and settings will be reset to default. The entire process can take up to an hour or more, so make sure your PC is plugged in.
Sure, it’s a bit of a hassle, but it’s a reliable way to banish that pesky driver error. Don’t lose heart! You’re on the right track.
Frequently Asked Questions
1. What Are the Potential Risks of Updating or Uninstalling Corrupt Drivers?
Imagine this: you’re about to update or uninstall a corrupt driver. It’s a necessary step, but it’s not without risks.
You could end up with incompatible or outdated drivers, which can cause system instability or conflicts. You might face issues like sudden PC shutdowns, reduced performance, or a complete system crash. So, tread with caution.
It might feel like walking on thin ice, but remember, it’s all part of keeping your computer healthy and running smoothly.
2. How Long Does Running a Windows Update Troubleshooter typically takes?
The time needed to run a Windows Update Troubleshooter can vary based on your system’s issues, but generally, it’s quite quick. You can expect it to take anywhere from a few minutes to an hour.
However, if your system has significant problems, it might take longer. Remember, while it’s running, you won’t be able to use your PC for other tasks.
It’s best to run the troubleshooter when you’re not in the middle of important work.
3. Can Running an Sfc Scan Potentially Damage My Computer or Its Files?
Imagine you’re a doctor, giving your patient a routine check-up. Running an SFC (System File Checker) scan is like this check-up. It’s designed to locate and fix any issues, not cause them. It’s a tool built into Windows to repair corrupted system files. So, running an SFC scan won’t damage your computer or its files. Instead, it’s like giving your computer a health check, ensuring everything’s working as it should.
4. Will Disabling the Lan of My Bios Affect My Computer’s Inetrnet Connectivity?
Disabling the LAN in your BIOS will affect your computer’s internet connectivity. The LAN (Local Area Network) connects your PC to the internet. By disabling it, you’re cutting off your computer’s ability to connect to the web.
5. Can I Use My Computer Normally While the Bios are Upgraded?
You can use your computer while the BIOS is being upgraded, but it’s not recommended. The BIOS update process is critical and any interruption can cause serious issues like system failure. It’s best to let the process complete without any interference.
Ensure your system is connected to a power source to avoid any shutdowns. Once the upgrade is complete, you can resume your regular activities. It’s always better to be safe than sorry.
Conclusion
In conclusion, don’t let the 0xC1900101 error wrench your Windows 10 experience. With these 12 fixes, you’re equipped to tackle it head on.
From updating corrupt drivers to resetting your computer, you’ve got the power to squash this bug.
Remember, sometimes the solutions are as simple as disabling your LAN or removing third-party applications.
So, keep calm and carry on troubleshooting!