Have you ever been in the middle of creating a presentation when you realized that one of your images is facing the wrong direction? Maybe you’re trying to create a balanced design where two images mirror each other, or perhaps you’ve imported a photo that just doesn’t flow well with your slide’s visual narrative. If you’ve found yourself asking “how do I flip a picture in PowerPoint,” you’re definitely not alone.
I remember the first time I encountered this challenge. I was working on a presentation about customer journey mapping, and I had this perfect image of arrows pointing in different directions. The problem? Half of them were pointing the wrong way for my slide layout. I spent what felt like hours trying to figure out how to flip them properly without losing quality or messing up my carefully crafted design.
The good news is that Microsoft PowerPoint offers several intuitive ways to flip pictures, and once you know these methods, you’ll wonder why you ever struggled with image orientation in the first place. Whether you’re using PowerPoint 2016, PowerPoint 2019, PowerPoint 2021, or Microsoft 365, the techniques I’m about to share will transform how you handle images in your presentations.
In this comprehensive guide, we’ll explore multiple methods for flipping pictures in PowerPoint, from the basic Picture Format tab approach to advanced techniques for batch processing multiple images. You’ll learn not just the “how” but also the “when” and “why” behind each method, ensuring you can choose the right approach for your specific situation.
By the end of this article, you’ll be confidently flipping images like a PowerPoint pro, creating more visually appealing presentations that truly capture your audience’s attention. Let’s dive in and master this essential skill together.
Also Read:
Vlc Player How to Rotate Video
What Can I Use Instead of Facebook?
How to Check Read Write Speed of SD Card
Why Did My Firestick Stop Working?
How to Redirect SMS to Email
Understanding Picture Flipping in PowerPoint
Before we jump into the step-by-step instructions, let’s make sure we’re all on the same page about what “flipping” actually means in the context of PowerPoint image editing. Understanding these fundamentals will help you choose the right technique for your specific needs.
When we talk about flipping a picture in PowerPoint, we’re referring to creating a mirror image of the original. Think of it like holding a photograph up to a mirror – the image appears reversed. This is different from rotating, which turns the image around a central point by specific degrees (like 90° or 180°).
There are two primary types of flips you can perform in PowerPoint:
Horizontal flipping (also called flip horizontal) creates a left-to-right mirror image. If you have a picture of someone pointing to the right, flipping it horizontally would make them appear to point to the left. This is probably the most commonly used flip operation, especially when you’re trying to create balanced designs or need images to face toward the center of your slide.
Vertical flipping (or flip vertical) creates a top-to-bottom mirror image. This turns your image upside down, which might sound less useful, but it’s actually quite handy for creating reflection effects or when working with abstract designs and patterns.
Here’s when you might find yourself needing to flip pictures in your presentations:
Creating visual balance is probably the most common reason. When you have multiple images on a slide, having them face each other or point toward a central element creates a more harmonious composition. I often use this technique when showcasing before and after comparisons or when creating symmetrical slide layouts.
Fixing orientation issues is another frequent scenario. Sometimes you’ll import an image that was taken or created with a specific orientation in mind, but it doesn’t work well with your slide’s flow. Rather than hunting for a different image, flipping can often solve the problem instantly.
Design consistency becomes important when you’re working with icons, illustrations, or graphic elements that need to match a specific directional theme throughout your presentation. For instance, if your presentation uses arrows or people figures that should all face the same direction, flipping helps maintain that consistency.
The great news is that all modern versions of PowerPoint support these flipping operations. Whether you’re using PowerPoint 2016, PowerPoint 2019, PowerPoint 2021, or the cloud-based Microsoft 365 version, the core functionality remains consistent. There might be slight variations in menu layouts or button positions, but the fundamental processes I’ll show you work across all these versions.
One important thing to note is that flipping in PowerPoint is non-destructive. This means your original image file remains unchanged – PowerPoint simply applies the flip as a visual transformation. You can always undo the flip or apply additional transformations without worrying about permanently altering your source image.
Method 1: Using the Picture Format Tab
The Picture Format tab is your go-to destination for most image editing tasks in PowerPoint, and flipping pictures is no exception. This method is straightforward, intuitive, and works consistently across all PowerPoint versions. Let me walk you through this process step by step.
First, you’ll need to select the image you want to flip. Click once on the picture, and you’ll notice that selection handles (small squares) appear around the edges. This indicates that the image is active and ready for editing. You’ll also see that the Picture Format tab automatically appears in your ribbon at the top of the screen.
If you don’t see the Picture Format tab, don’t panic. This tab only appears when you have an image selected. Make sure you’ve clicked directly on the image (not just near it), and the tab should appear. Sometimes, if you have multiple objects on your slide, you might accidentally select something else, so double-check that your intended image is highlighted.
Once you have your image selected and can see the Picture Format tab, click on it to reveal all the image editing options. Look for the Arrange group on the right side of the ribbon. Within this group, you’ll find the Rotate button, which might display as either a text label or a small icon showing a curved arrow.
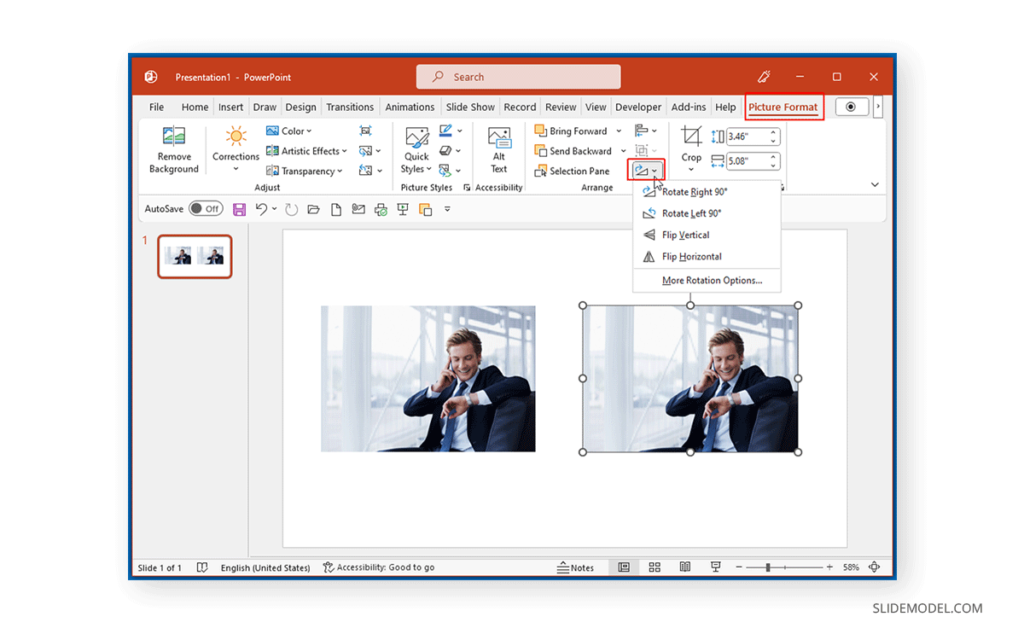
Click on the Rotate button, and you’ll see a dropdown menu with several options. Here’s where the magic happens – you’ll see two flip options:
Flip Horizontal will create a left-to-right mirror image of your picture. This is perfect when you need an image to face the opposite direction or when creating symmetrical designs.
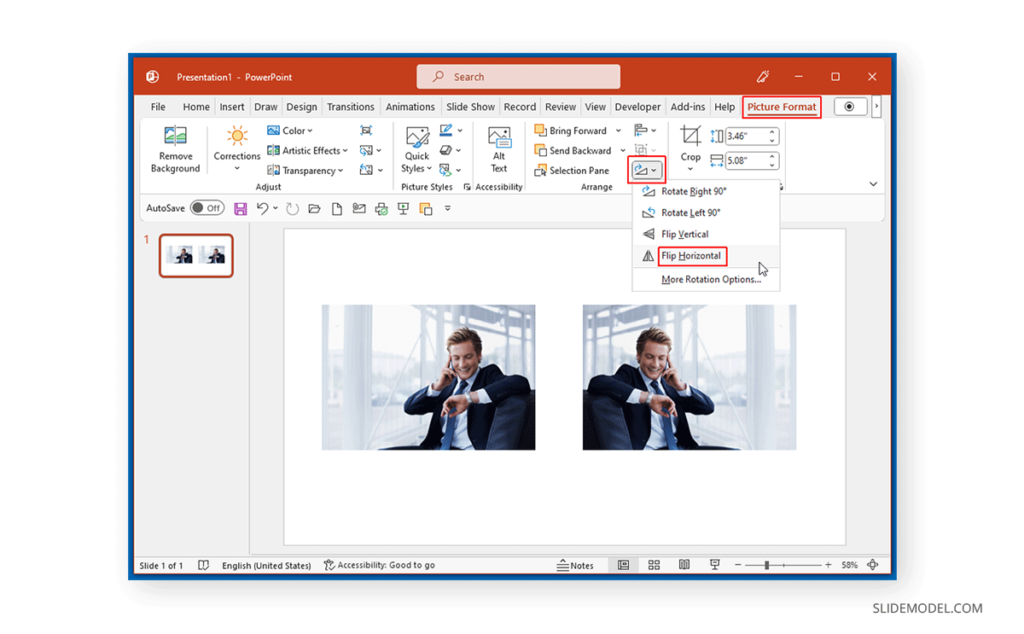
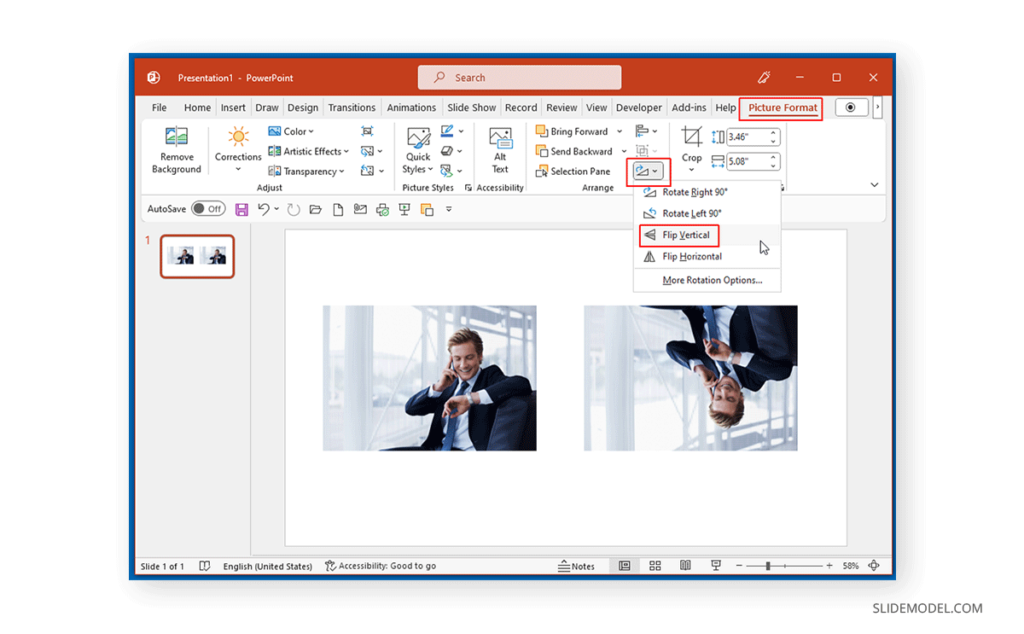
Flip Vertical will create a top-to-bottom mirror image, essentially turning your image upside down. While this might seem less commonly useful, it’s great for creating reflection effects or working with abstract designs.
| Flip Option | Effect | Common Use Cases |
|---|---|---|
| Flip Horizontal | Creates left-to-right mirror image | Balancing slide composition, changing direction of subjects, creating symmetry |
| Flip Vertical | Creates top-to-bottom mirror image | Reflection effects, abstract designs, creative layouts |
| Rotate Right 90° | Turns image clockwise | Portrait to landscape orientation |
| Rotate Left 90° | Turns image counterclockwise | Landscape to portrait orientation |
Simply click on your desired flip option, and PowerPoint will instantly apply the transformation. The beauty of this method is its immediacy – you can see the result right away and decide if it’s what you wanted.
Here are some pro tips to make your flipping workflow more efficient:
Preview before committing: Hover over the flip options in the dropdown menu, and PowerPoint will show you a preview of how your image will look. This live preview feature helps you make the right choice without having to apply and undo changes.
Use keyboard shortcuts: Once you’re comfortable with the process, you can speed things up by using Alt + JD + FH for horizontal flip and Alt + JD + FV for vertical flip. These shortcuts work when you have an image selected.
Combine with other transformations: The Picture Format tab offers many other editing options. You can flip an image and then adjust its brightness, contrast, or apply artistic effects all in one editing session.
Work with grouped objects: If you’ve grouped multiple images together, you can flip the entire group using the same method. Just select the group and follow the same steps.
One common mistake I see people make is trying to flip an image that’s part of a SmartArt graphic or chart. These elements have special properties and might not respond to the standard flip commands. We’ll cover how to handle these special cases later in this guide.
Another thing to keep in mind is that flipping doesn’t change the file size or resolution of your image. It’s purely a visual transformation, so you don’t need to worry about quality degradation or increased file sizes.
Method 2: Using the Arrange Menu
While the Picture Format tab method is the most straightforward approach, PowerPoint offers an alternative route through the Arrange menu that some users find more intuitive, especially when working with complex slide layouts containing multiple objects. This method gives you access to the same flipping functionality but through a different pathway.
To use this method, start by selecting your image just as you did in the previous method. Once your image is selected, you have two ways to access the Arrange menu:
The first way is through the Home tab. Navigate to the Home tab in your ribbon, and look for the Arrange group. This group contains various tools for positioning and manipulating objects on your slide. Within this group, you’ll find the Rotate option.
The second way is through the right-click context menu. Right-click directly on your selected image, and you’ll see a context menu appear. Look for the Rotate option in this menu. This method is often faster, especially if you’re already working directly with the image.
Regardless of which path you choose, clicking on Rotate will reveal the same dropdown menu we saw in Method 1, with options for Flip Horizontal, Flip Vertical, and various rotation angles.
Here’s a comparison table showing when each access method works best:
| Access Method | Best Used When | Advantages | Considerations |
|---|---|---|---|
| Home Tab → Arrange | Working with slide layout and positioning | Consistent location, easy to find | Requires navigation to Home tab |
| Right-click → Rotate | Quick edits on individual images | Fastest access, context-sensitive | Must remember right-click option |
| Picture Format Tab | Comprehensive image editing | All image tools in one place | Only appears when image is selected |
The keyboard shortcuts for this method are particularly useful once you get comfortable with them. Here are the key combinations that can speed up your workflow:
| Action | Keyboard Shortcut | Description |
|---|---|---|
| Flip Horizontal | Alt + H + G + FH | Quick horizontal flip via Home tab |
| Flip Vertical | Alt + H + G + FV | Quick vertical flip via Home tab |
| Rotate Right 90° | Alt + H + G + RR | Rotate clockwise |
| Rotate Left 90° | Alt + H + G + RL | Rotate counterclockwise |
One of the advantages of using the Arrange menu approach is that it keeps you in the Home tab environment, which is where you’ll likely be doing most of your slide editing work. This means less tab-switching and a more streamlined workflow, especially when you’re making multiple edits to various slide elements.
This method is particularly useful when you’re working on complex slide layouts with multiple images, text boxes, and shapes. Since the Arrange group also contains tools for layering objects (Bring Forward, Send Backward), aligning objects, and grouping elements, you can handle all your positioning and orientation tasks from one location.
Troubleshooting tip: If you find that the Rotate option is grayed out or unavailable, check to make sure you have the correct object selected. Sometimes, clicking near an image might select a text box or shape instead of the image itself. The selection handles around your object will help you confirm what’s actually selected.
Another scenario where this method shines is when you’re working with multiple monitors or smaller screens. The right-click approach doesn’t require you to navigate through ribbon tabs, which can be especially helpful if your ribbon is collapsed or if you’re working in a constrained screen space.
Method 3: Manual Rotation and Flipping
Sometimes, the standard flip options don’t give you exactly what you need. Maybe you want to create a custom angle that’s not quite horizontal or vertical, or perhaps you need to combine flipping with precise rotation for a specific design effect. This is where manual rotation and flipping techniques come into play.
When you select an image in PowerPoint, you’ll notice a green rotation handle that appears above the image. This circular arrow icon is your gateway to custom rotation angles. While this handle is primarily designed for rotation, you can use it creatively to achieve flipping effects combined with precise positioning.
To create a manual horizontal flip, you can rotate your image 180 degrees and then use the vertical flip option. This might seem roundabout, but it gives you more control over the final positioning. Grab the green rotation handle and drag it in a circular motion. As you drag, you’ll see a degree indicator showing you the exact angle of rotation.
For precise angle control, hold down the Shift key while dragging the rotation handle. This constrains the rotation to 15-degree increments, making it easier to achieve exact angles like 45°, 90°, or 180°. This technique is invaluable when you’re creating geometric designs or need to match specific angular requirements in your presentation.
Here’s a step-by-step approach for advanced manual manipulation:

Step 1: Select your image and locate the green rotation handle above it.
Step 2: For custom angles, drag the handle freely. For precise increments, hold Shift while dragging.
Step 3: Combine rotation with the standard flip options from the Rotate menu to achieve complex transformations.
Step 4: Use the alignment guides that appear as you move the image to ensure proper positioning relative to other slide elements.
The manual method becomes particularly powerful when you’re working with design elements that need to follow specific directional flows. For instance, if you’re creating an infographic with arrows or directional indicators, you might need angles that aren’t available through the standard flip options.
Advanced tip: You can also type exact rotation values for ultimate precision. Right-click on your image, select Format Picture, and navigate to the Size & Properties section. Here, you can enter specific rotation values in degrees, giving you mathematical precision that’s impossible to achieve through manual dragging.
When working with multiple images that need consistent custom angles, this numeric input method ensures perfect uniformity across all your visual elements. This is especially important in professional presentations where precision and consistency reflect attention to detail.
Combining transformations is where manual methods really shine. You might start with a horizontal flip, add a 30-degree rotation, and then fine-tune the position. Each transformation builds on the previous one, allowing you to create unique visual effects that would be impossible with standard options alone.
One thing to keep in mind with manual rotation is that text readability can be affected. If your image contains text or if you’re rotating text boxes along with images, make sure the final result remains legible for your audience.
Flipping Different Types of Visual Elements
While we’ve focused primarily on photographs and standard images, PowerPoint presentations often contain various types of visual elements that each have their own considerations when it comes to flipping. Understanding how to handle text boxes, shapes, icons, charts, and SmartArt will make you a more versatile PowerPoint user.
Flipping Text Boxes and WordArt
Text boxes and WordArt present unique challenges when flipping because readability is paramount. When you flip text horizontally, it becomes mirror writing – readable only when viewed in a mirror. This is rarely what you want in a presentation context.
However, there are legitimate reasons to flip text elements. You might be creating artistic effects, watermarks, or background design elements where the text serves more as a visual texture than readable content. In these cases, flipped text can add visual interest without compromising communication.
To flip text elements, select your text box or WordArt object and use the same methods we’ve covered: Picture Format tab, Arrange menu, or right-click options. The process is identical, but the considerations are different.
Best practices for flipping text:
- Consider your audience: Will they need to read this text, or is it purely decorative?
- Test readability: After flipping, step back and evaluate whether the text still serves its intended purpose.
- Use sparingly: Flipped text can be disorienting, so use it only when it adds genuine value to your design.
- Combine with transparency: Flipped text often works better when made semi-transparent, serving as a subtle background element.
Flipping Shapes and Icons
Shapes and icons are generally much more forgiving when it comes to flipping. Most geometric shapes look identical when flipped, but directional shapes like arrows, triangles pointing in specific directions, or asymmetrical designs will show clear changes.
Built-in PowerPoint shapes can be flipped using the same methods as images. Select the shape and use the Rotate menu options. This is particularly useful when creating flowcharts, process diagrams, or directional indicators where you need arrows or pointers facing different directions.
Icons from PowerPoint’s icon library or imported from external sources respond well to flipping. This is especially useful when creating balanced layouts where you want icons on either side of your slide to face toward the center, creating a more cohesive visual flow.
Maintaining proportions is crucial when working with shapes and icons. PowerPoint’s flip functions preserve the original proportions, but if you’ve manually resized a shape before flipping, make sure the final result still looks balanced and professional.
Flipping Charts and SmartArt
Charts and SmartArt graphics require special consideration because they often contain data relationships or logical flows that shouldn’t be arbitrarily reversed. However, there are scenarios where flipping these elements makes sense.
For charts, you generally want to avoid flipping because it can confuse data interpretation. A bar chart that shows growth from left to right, when flipped, would appear to show decline. However, if you’re using a chart purely as a design element rather than for data communication, flipping might be appropriate.
SmartArt graphics vary in their suitability for flipping. Process flows and hierarchical diagrams usually shouldn’t be flipped because they represent logical sequences. However, decorative SmartArt or symmetrical designs can often be flipped without losing meaning.
When you do need to flip these complex elements, you have a few options:
Option 1: Ungroup the elements first. Right-click on the SmartArt or chart, select “Group,” then “Ungroup.” This breaks the object into individual components that you can flip separately.
Option 2: Convert to image first. Right-click and select “Save as Picture,” then re-insert the saved image and flip it normally. This approach loses the editability of the original object but gives you complete flipping control.
Option 3: Recreate with opposite orientation. For SmartArt, you might find it easier to create a new SmartArt graphic with the desired orientation rather than trying to flip the existing one.
Here’s a decision matrix to help you choose the right approach:
| Element Type | Recommended Approach | Considerations |
|---|---|---|
| Photos/Images | Standard flip methods | No special considerations |
| Text Boxes | Flip only for artistic effect | Readability concerns |
| Basic Shapes | Standard flip methods | Check directional meaning |
| Icons | Standard flip methods | Great for balanced layouts |
| Charts | Avoid flipping data charts | Consider data interpretation |
| SmartArt | Ungroup or recreate | Preserve logical flow |
Advanced Flipping Techniques
Once you’ve mastered the basic flipping methods, you can explore more sophisticated techniques that will elevate your PowerPoint design skills. These advanced flipping techniques are particularly valuable when working on professional presentations or complex design projects.
Batch flipping multiple images is a real time-saver when you’re working with presentations that contain many images requiring the same transformation. While PowerPoint doesn’t have a built-in “flip all” command, you can achieve this efficiently through grouping.
To batch flip multiple images, first select all the images you want to flip. You can do this by holding the Ctrl key while clicking each image, or by drawing a selection box around multiple images. Once you have all your target images selected, right-click and choose Group > Group from the context menu.
Now you have a single grouped object containing all your images. Apply the flip command to this group using any of the methods we’ve covered, and all images within the group will flip simultaneously. After flipping, you can ungroup the images if you need to work with them individually again.
Creating mirror effects is a popular design technique that involves duplicating an image and flipping the copy to create a symmetrical composition. Here’s how to create professional-looking mirror effects:
Step 1: Copy your original image (Ctrl+C) and paste it (Ctrl+V) to create a duplicate.
Step 2: Position the duplicate adjacent to the original image.
Step 3: Flip the duplicate horizontally using any of our covered methods.
Step 4: Fine-tune the positioning so the images appear to mirror each other perfectly.
Step 5: Consider adding transparency or fade effects to the flipped image to create a more subtle reflection effect.
This technique works particularly well with portraits, product images, or architectural photos where symmetry enhances the visual impact.
Combining flips with other transformations opens up creative possibilities that go beyond simple mirroring. You can combine flipping with scaling, rotation, color adjustments, and artistic effects to create unique visual compositions.
For example, you might flip an image horizontally, then apply a 50% transparency, and finally add a soft edge effect to create a subtle background element that doesn’t compete with your main content but adds visual interest.
Using guides and alignment tools becomes crucial when working with multiple flipped elements. PowerPoint’s Smart Guides automatically appear when you’re moving objects, helping you align flipped images with other slide elements. You can also access more precise alignment tools through the Arrange menu.
Here’s a table of advanced techniques and their applications:
| Technique | Application | Skill Level | Time Investment |
|---|---|---|---|
| Batch Flipping | Multiple similar images | Intermediate | Low |
| Mirror Effects | Artistic compositions | Intermediate | Medium |
| Combined Transformations | Creative designs | Advanced | High |
| Precision Alignment | Professional layouts | Advanced | Medium |
Professional design tips for advanced flipping:
Maintain visual hierarchy: When using flipped images, ensure they don’t disrupt the natural flow of information on your slide. The human eye typically scans from left to right (in Western cultures), so consider this when positioning flipped elements.
Create focal points: Use flipped images strategically to direct attention toward key content. For instance, if you have a person in an image pointing or looking in a specific direction, flip them so they’re directing attention toward your most important slide element.
Consider cultural context: In some cultures, reading patterns move from right to left. If you’re presenting to international audiences, consider how flipped images might be perceived differently across cultures.
Test at different sizes: Flipped images might look perfect on your computer screen but appear differently when projected or viewed on smaller devices. Always test your flipped elements at the actual presentation size.
Troubleshooting Common Issues
Even with the best techniques, you might encounter challenges when flipping pictures in PowerPoint. Understanding these common issues and their solutions will save you time and frustration during your presentation preparation.
“Picture won’t flip” problems are among the most frequent issues users encounter. If your flip commands seem to have no effect, here are the most likely causes and solutions:
Issue: The image appears to be selected, but flip commands are grayed out or don’t work.
Solution: You might have selected a grouped object or placeholder rather than the actual image. Try double-clicking on the image to select it directly, or right-click and choose “Edit Picture” if it’s part of a group.
Issue: Multiple objects are selected, including non-image elements.
Solution: Click elsewhere on the slide to deselect everything, then click specifically on just the image you want to flip. Make sure only the target image shows selection handles.
Issue: The image is part of a SmartArt graphic or chart.
Solution: These complex objects don’t respond to standard flip commands. You’ll need to ungroup them first or use the alternative methods we discussed earlier.
Quality degradation is another concern that users sometimes worry about. The good news is that PowerPoint’s flip operations are non-destructive and don’t actually alter your original image file. However, you might notice apparent quality issues in certain situations:
Pixelation after flipping usually indicates that your original image resolution was already at the limit for your intended use. Flipping doesn’t reduce quality, but it might make existing quality limitations more apparent. Consider using a higher-resolution source image if this becomes problematic.
Blurry edges can occur if you’ve applied multiple transformations in sequence. Each transformation requires PowerPoint to recalculate the image display, and multiple operations can sometimes result in slight softening. If this happens, try undoing all transformations and applying them in a different order, or start fresh with your original image.
Alignment problems after flipping are common because flipped images might not align with other slide elements the way you expect. Here are strategies to address alignment issues:
Use PowerPoint’s alignment tools: Select your flipped image along with other elements you want it to align with, then use the Align options in the Arrange menu to ensure perfect positioning.
Enable gridlines: Go to View > Gridlines to display a grid that helps with manual positioning. This is especially useful when creating symmetrical layouts with flipped elements.
Leverage Smart Guides: These automatically appear as you move objects and help you align with other slide elements. Make sure they’re enabled in your PowerPoint settings.
Here’s a troubleshooting table for quick reference:
| Problem | Likely Cause | Solution | Prevention |
|---|---|---|---|
| Flip commands grayed out | Wrong object selected | Select image directly | Click precisely on target image |
| No visible change after flip | Image is symmetrical | Normal behavior | Check with asymmetrical test image |
| Quality appears degraded | Low original resolution | Use higher resolution source | Start with high-quality images |
| Alignment issues | Automatic positioning | Use alignment tools | Plan layout before flipping |
| Can’t undo flip | Too many operations | Use Edit > Undo multiple times | Save versions before major changes |
When to start over versus fixing issues is an important decision. If you’ve applied multiple transformations and the result isn’t what you wanted, sometimes it’s faster to delete the problematic image and start fresh rather than trying to undo and redo multiple operations.
Undo and redo functionality in PowerPoint is your safety net. The Ctrl+Z shortcut will undo your last action, and you can press it multiple times to step back through recent changes. Ctrl+Y will redo actions you’ve undone. PowerPoint typically maintains a history of your last 20-50 actions, depending on your version and settings.
Performance considerations become important when working with many high-resolution images or complex transformations. If PowerPoint becomes sluggish after multiple flip operations, try these optimization strategies:
- Compress images after final positioning to reduce file size
- Work with copies of your presentation for experimental changes
- Save frequently to avoid losing work due to performance issues
- Close other applications to free up system resources
Best Practices and Design Tips
Mastering the technical aspects of flipping pictures is just the beginning. To create truly professional presentations, you need to understand the design principles and best practices that govern when and how to use flipped images effectively.
Visual balance is perhaps the most important consideration when incorporating flipped images into your presentations. The human eye naturally seeks equilibrium in visual compositions, and flipped images can either enhance or disrupt this balance depending on how they’re used.
When creating symmetrical layouts, flipped images can provide perfect balance. For example, if you have two product photos flanking a central text block, flipping one so both products face toward the center creates a cohesive, professional appearance. This technique draws the viewer’s eye inward toward your key message rather than allowing it to wander off the edges of the slide.
Asymmetrical balance can also benefit from strategic image flipping. If you have a large image on one side of your slide, you might flip a smaller complementary image on the opposite side to create visual tension that keeps the composition interesting while maintaining overall balance.
Directional flow is crucial in presentation design. Most Western audiences read from left to right, so images that support this natural eye movement tend to feel more comfortable and intuitive. If you have an image of a person pointing or looking in a specific direction, consider whether that direction supports or conflicts with your slide’s information flow.
Here are key design principles to follow:
The Rule of Thirds: When positioning flipped images, consider the rule of thirds. Place important visual elements along the imaginary lines that divide your slide into thirds, both horizontally and vertically. Flipped images positioned according to this rule tend to feel more natural and engaging.
Contrast and Emphasis: Use flipped images to create contrast that emphasizes your key points. A flipped image that breaks a pattern of similar-facing images can draw attention to specific content or create visual punctuation in your presentation flow.
Consistency Throughout: If you flip images in one section of your presentation, consider whether similar flipping should be applied throughout for consistency. Random flipping without purpose can make your presentation feel chaotic and unprofessional.
Accessibility considerations are increasingly important in professional presentations. When flipping images, consider how your choices affect viewers with different needs:
Screen readers used by visually impaired audience members typically can’t interpret the directional significance of flipped images. Make sure your content doesn’t rely solely on visual direction to convey important information.
Cognitive accessibility benefits from consistent and predictable visual patterns. If you establish a pattern of image orientation early in your presentation, sudden changes might be confusing for some audience members.
Cultural sensitivity around reading patterns and visual interpretation should inform your flipping decisions, especially for international presentations.
File size management becomes important when working with multiple high-resolution images, especially flipped ones. While flipping doesn’t inherently increase file size, the additional image objects in your presentation can accumulate:
Compress images after finalizing your flips. PowerPoint’s built-in compression tools can significantly reduce file size without noticeable quality loss for presentation purposes.
Consider your delivery method: If you’re emailing your presentation or uploading it to a platform with size restrictions, optimized images become crucial.
Balance quality with practicality: Ultra-high-resolution images might look perfect on your screen but could cause performance issues during actual presentation delivery.
Professional presentation standards vary by industry and context, but some universal principles apply:
Maintain brand consistency: If your organization has brand guidelines about image usage, ensure your flipped images still comply with these standards.
Consider your audience: Technical audiences might appreciate precise, symmetrical layouts with carefully flipped elements, while creative audiences might prefer more dynamic, asymmetrical approaches.
Test your presentation: Always preview your slides in presentation mode and at actual presentation size to ensure flipped images work effectively in context.
Here’s a best practices checklist:
| Design Element | Best Practice | Why It Matters |
|---|---|---|
| Visual Balance | Use flipping to create symmetry or intentional asymmetry | Guides viewer attention effectively |
| Directional Flow | Align image direction with reading patterns | Supports natural eye movement |
| Consistency | Apply similar flipping logic throughout | Creates professional, cohesive appearance |
| Accessibility | Don’t rely solely on visual direction | Ensures inclusive communication |
| File Optimization | Compress after final positioning | Maintains performance and shareability |
Frequently Asked Questions
Throughout my years of helping people master PowerPoint, I’ve encountered the same questions about flipping pictures repeatedly. Here are the most common concerns and their comprehensive answers.
Can I flip multiple pictures at once?
Yes, you absolutely can flip multiple pictures simultaneously, though the process requires a slightly different approach than flipping individual images. The key is grouping your images first. Select all the images you want to flip by holding the Ctrl key and clicking each image, or by drawing a selection box around them. Once selected, right-click and choose Group > Group. Now you can apply flip commands to the entire group, and all images will flip together. After flipping, you can ungroup them if needed by right-clicking and selecting Group > Ungroup.
This batch flipping technique is particularly useful when you’re working with photo galleries, product showcases, or any presentation where multiple images need consistent orientation changes.
Does flipping affect image quality?
This is one of the most common concerns, and I’m happy to report that flipping does not degrade image quality in PowerPoint. The flip operation is what we call “non-destructive,” meaning it doesn’t actually alter the pixels of your original image. Instead, PowerPoint applies the flip as a display transformation while keeping your source image intact.
However, you might notice apparent quality issues if:
- Your original image was already low resolution
- You’ve applied multiple transformations in sequence
- You’re viewing the image at a much larger size than its original resolution
The flip itself doesn’t cause quality loss, but it might make existing quality limitations more apparent.
How do I flip a picture back to its original orientation?
Returning a flipped image to its original state is straightforward. Simply apply the same flip command again. If you flipped an image horizontally, flip it horizontally again to return it to the original orientation. PowerPoint doesn’t have a specific “reset to original” command for flips, but this double-flip method works perfectly.
Alternatively, you can use Ctrl+Z (Undo) immediately after flipping if you haven’t performed other actions in between. For more complex situations where you’ve made multiple changes, you might need to press Ctrl+Z several times to step back through your recent actions.
What’s the difference between flip and mirror?
In PowerPoint terminology, “flip” and “mirror” refer to the same operation. When you flip an image horizontally, you’re creating a mirror image of the original. The terms are used interchangeably in most contexts. Some design software makes distinctions between these terms, but PowerPoint treats them as synonymous.
The confusion often arises because “mirror” is more descriptive of the visual result (like looking in a mirror), while “flip” describes the action being performed.
Can I flip animated GIFs?
Yes, you can flip animated GIFs in PowerPoint using the same methods as static images. The animation will continue to play normally after flipping. However, keep in mind that flipping might affect the visual logic of the animation. For example, if your GIF shows movement from left to right, flipping it horizontally will make the movement appear to go from right to left.
Also note that some complex GIFs might experience slight performance impacts after flipping, especially if they’re high-resolution or have many frames.
How do I flip pictures on PowerPoint mobile apps?
The PowerPoint mobile apps (iOS and Android) support image flipping, though the interface is slightly different from the desktop version. Here’s how:
- Tap to select your image
- Look for the “Picture” tab that appears at the bottom
- Tap “Rotate”
- Select “Flip Horizontal” or “Flip Vertical”
The mobile interface is designed for touch interaction, so some options might be organized differently, but the core functionality remains the same.
Here’s a quick reference table for common FAQ topics:
| Question Category | Quick Answer | Detailed Solution Location |
|---|---|---|
| Batch Operations | Yes, use grouping | Method 2: Using the Arrange Menu |
| Quality Concerns | No degradation from flipping | Troubleshooting Common Issues |
| Undoing Changes | Use same flip command or Ctrl+Z | Best Practices section |
| Mobile Usage | Available with touch interface | This FAQ section |
| Animated Content | Supported with considerations | This FAQ section |
Additional common questions:
Why can’t I flip my SmartArt or chart? These are complex objects that don’t respond to standard flip commands. You’ll need to ungroup them first or convert them to images. See our section on “Flipping Different Types of Visual Elements” for detailed solutions.
Can I set a default flip for all new images? PowerPoint doesn’t offer a default flip setting. Each image must be flipped individually or as part of a group. However, you can create custom templates with pre-flipped placeholder images if you frequently need images in specific orientations.
Will flipped images print correctly? Yes, flipped images will print exactly as they appear on screen. The flip transformation is part of the slide layout and will be preserved in printed output.
Can I flip part of an image? PowerPoint’s flip commands work on entire image objects. If you need to flip only a portion of an image, you’ll need to use external image editing software to crop and flip the desired section before importing it into PowerPoint.
Alternative Tools and Methods
While PowerPoint’s built-in flipping capabilities are robust and sufficient for most presentation needs, there are situations where external tools or alternative approaches might be more appropriate or efficient. Understanding these options will help you choose the best method for your specific requirements.
Third-party image editing software offers more sophisticated flipping and transformation options than PowerPoint’s built-in tools. Programs like Adobe Photoshop, GIMP (free), Canva, or even simpler tools like Paint.NET provide advanced editing capabilities before you import images into your presentation.
When might you want to edit images externally before importing them into PowerPoint? Here are some scenarios:
Batch processing large numbers of images: If you need to flip dozens or hundreds of images, dedicated image editing software often provides more efficient batch processing capabilities than PowerPoint’s grouping method.
Complex transformations: When you need to combine flipping with advanced effects like selective color adjustments, layer blending, or precise cropping, external editors offer more sophisticated tools.
Quality optimization: Professional image editing software provides better compression algorithms and format conversion options, which can be important for presentations with strict file size requirements.
Online tools have become increasingly popular for quick image editing tasks. Services like Canva, Photopea (free Photoshop alternative), Pixlr, and Remove.bg offer browser-based image editing that doesn’t require software installation.
These online tools are particularly useful when:
- You’re working on a computer where you can’t install software
- You need quick edits without the complexity of full editing suites
- You’re collaborating with team members who need to make similar edits
- You want to maintain consistent editing settings across multiple users
Integration workflows with other Microsoft Office applications can streamline your image preparation process:
Excel to PowerPoint: If you’re creating charts or data visualizations in Excel that need specific orientations, you might find it easier to flip them in Excel before copying to PowerPoint, especially for complex multi-element charts.
Word to PowerPoint: When repurposing content from Word documents, images might need orientation adjustments to work well in presentation layouts. Consider your flip requirements during the content transfer process.
OneDrive and SharePoint integration: If your images are stored in Microsoft’s cloud services, you can use the basic editing tools available in the web interface to flip images before inserting them into PowerPoint.
Here’s a comparison of different approaches:
| Method | Best For | Advantages | Limitations |
|---|---|---|---|
| PowerPoint Built-in | Most presentation needs | Integrated workflow, no additional software | Limited to basic flips |
| Adobe Photoshop | Professional editing | Advanced features, batch processing | Cost, learning curve |
| Free alternatives (GIMP) | Budget-conscious users | Full features, no cost | Steeper learning curve |
| Online tools | Quick edits, collaboration | No installation, accessible anywhere | Internet dependency, privacy concerns |
| Mobile apps | On-the-go editing | Convenience, touch interface | Limited features compared to desktop |
When to use external tools versus PowerPoint’s built-in capabilities:
Choose external tools when:
- You need to flip many images with consistent settings
- You require additional editing beyond simple flipping
- File size optimization is critical
- You’re working with specialized image formats
- You need to maintain editing history for future modifications
Stick with PowerPoint when:
- You’re making simple orientation adjustments
- You want to maintain an integrated workflow
- You’re working with images that are already optimized
- Time efficiency is more important than advanced features
- You’re collaborating with others who only have PowerPoint access
Workflow optimization tips for combining external editing with PowerPoint:
Establish naming conventions: If you’re editing images externally, use consistent naming that indicates orientation (e.g., “product_photo_flipped.jpg”) to avoid confusion when importing multiple versions.
Maintain source files: Keep your original, unedited images separate from your flipped versions. This gives you flexibility to make different edits later without starting from scratch.
Consider automation: Some image editing software allows you to create actions or scripts that can automatically flip and optimize images according to your specifications.
Plan your editing pipeline: If you regularly create presentations with similar image requirements, develop a standardized process that combines external editing with PowerPoint assembly for maximum efficiency.
Conclusion
As we wrap up this comprehensive guide to flipping pictures in PowerPoint, let’s recap the essential techniques and insights that will transform how you handle image orientation in your presentations.
We’ve explored three primary methods for flipping images in PowerPoint, each with its own advantages and ideal use cases. The Picture Format tab method offers the most intuitive approach for most users, providing easy access to flip options when you have an image selected. The Arrange menu method gives you alternative pathways through either the Home tab or right-click context menus, which can be more efficient depending on your workflow. Finally, manual rotation and flipping techniques provide the precision and creative control needed for advanced design work.
The key insight I want you to remember is that flipping is non-destructive. You’re never permanently altering your original images, which means you can experiment freely without fear of losing quality or making irreversible changes. This should give you confidence to try different orientations and see what works best for your specific presentation needs.
Understanding when to flip is just as important as knowing how to flip. We’ve covered the design principles that should guide your decisions: creating visual balance, supporting natural reading patterns, maintaining consistency throughout your presentation, and considering accessibility for all audience members. Remember that every flip should serve a purpose – whether that’s improving composition, directing attention, or creating visual harmony.
For different types of visual elements, you now know that while photos and basic shapes flip easily using standard methods, text boxes require special consideration for readability, and complex objects like charts and SmartArt might need alternative approaches such as ungrouping or external editing.
The troubleshooting strategies we’ve discussed will save you time and frustration when things don’t work as expected. Remember to check your selection carefully, use PowerPoint’s undo functionality liberally, and don’t hesitate to start fresh if you’ve applied too many transformations and lost track of your changes.