Cell locking in Google Sheets allows users to restrict the editing of specific cells, rows, columns or ranges. Locking cells protect against accidental or unauthorized changes to data. It helps maintain data integrity and consistency in spreadsheets.
There are several benefits to locking cells in Google Sheets:
- Prevent accidental edits to formulas, data, or formatting
- Restrict access to confidential or sensitive information
- Maintain data validation rules and dropdown lists
- Ensure charts, graphs, and conditional formats remain static
- Limit user permissions and editing of certain cells
Knowing when and how to lock cells properly is key to data security, accurate formulas, and controlling user editing abilities in Sheets.
How To Lock Cells In Google Sheets
What Does Locking Cells Mean?
Locked cells ensure that only the right people can read files within that specific part of the dictionary. Different methods are used to accomplish this, depending on the recorder application.
This kind of security essentially differs from other safeguards against tampering with recorder files. For instance, it ensures that only a certain amount isn’t tampered with rather than locking the entire document.
In some cases, it may not just be the cells, but the entire report will be unavailable. Likewise, with tools like Google Sheets, you will find cases where shareable access may be achieved. But it is possible to restrict access to as many people as possible.
However, locked cells can not be accessed by anyone but are the only cells locked. The rest of the sheet is accessible, and any other locked cells are free.
What Are the Benefits of Locking Cells in Your Spreadsheet?
It’s all about maintaining high quality, reliability, and accuracy in the report; that’s why locking cells is so important. Doing so prevents the introduction of inaccurate data into the report, whether sabotaged accidentally or intentionally.
It is crucial to consider that in circumstances where a report could greatly affect the future of a massive business. If a report contains errors from the decimal point, the results could be disastrous for the bottom line. The fact is that an additional anti-virus is rather easy to overlook if the document recorder already collects significant amounts of data.
You can use this to protect your sensitive accounts and the information they hold if nothing else. Even if you don’t pay attention, this will ensure that you won’t ruin them if you are not paying attention. A written report doesn’t have to be caused by an evildoer for it to be called a waste of paper; it may as well have been generated by human error.
Step by Step Method: How to lock cells in Google Sheets
Click on the Google Sheet document to open it
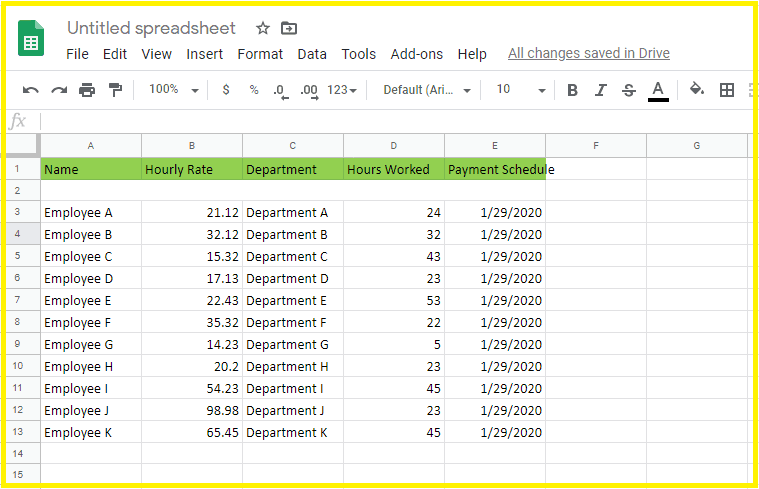
Choose either an existing Google Sheet document or create a new one, but keep the report important for the latter. You might end up screwing this up if you choose the former.
Click on Named Range
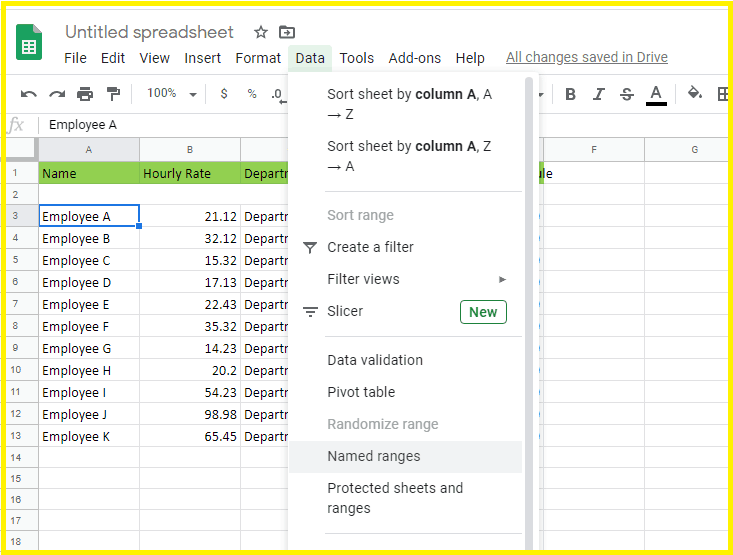
The Data menu on the taskbar can be displayed once the document is opened. Once the data menu is displayed, you can select the Named ranges option in the dropdown.
Set Named Range

Using the Named Ranges editor, you can type the name of the cell you want to lock, along with the cell address where it should be placed.
Named Ranges and Protected Sheets
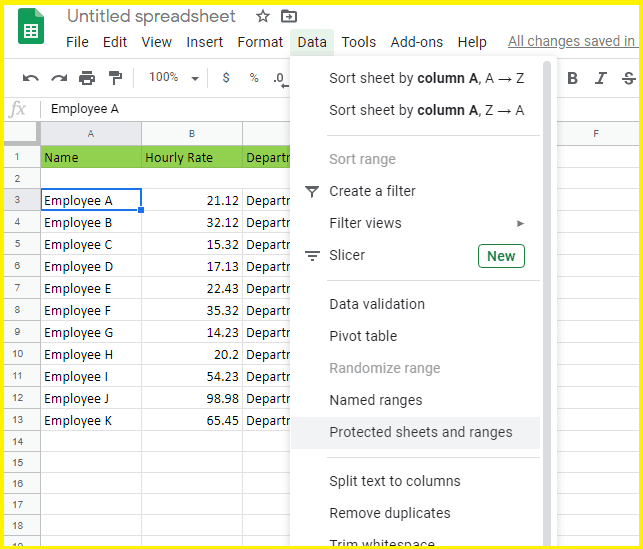
After creating the name for the cell, you can then choose Protected Sheets and Named Ranges from the dropdown menu on the Data menu that appears on the taskbar.
Setting Protected Sheets and Named Ranges
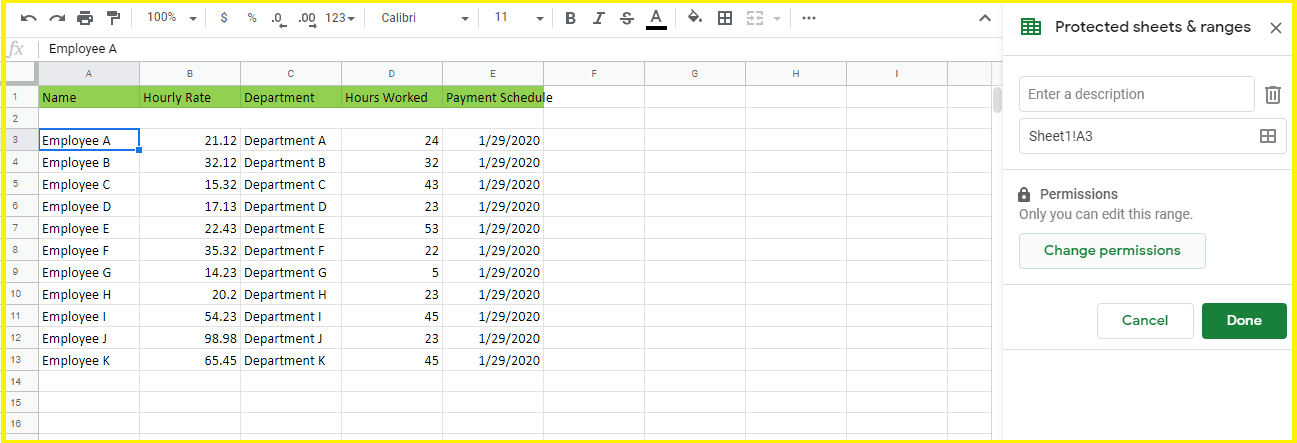
When the Protected Sheets and Named Ranges editor is open, you select a cell and then click the Change Permissions button to lock it.
Set the permissions

After clicking the Change Permissions button, a window will appear with settings where you can then control who can access the cell.
Locking Entire Sheets
To lock an entire sheet:
- Click Data > Protected Sheets and Ranges
- Under “Protected Sheets” select the sheet
- Click Set Permissions
- Configure user access
- Click Save. The sheet will be locked.
Permissions and Sharing
Cell locking permissions allow controlling exactly who can edit locked cells.
Setting Permissions
In the Cell Locking sidebar:
- Check “Restrict who can edit…”
- Click Sharing
- Choose users with edit access
- Click Save
Now only selected users can edit the locked cells.
Sharing Locked Cells
To share a sheet with locked cells:
- Click Share in the top right
- Select user access level:
- View only
- Comment only
- Edit access
- Click Send to grant access
Troubleshooting
Issues can arise when locking cells in Google Sheets:
Common Problems
- Accidentally locking cells needing edit access
- Locking referenced cells causing errors
- Forgetting passwords for protected ranges
- Improper user access to locked cells
- Locking causing issues with conditional formats
Unlocking Cells
To unlock cells:
- Right-click and select Unlock
- Go to Data > Protected sheets and ranges and delete the range
- Delete the protected sheet after selecting it
- Click Format > Lock and disable locking
Forgotten passwords require cracking the password to unlock the range.
Conclusion
Locking cells in Google Sheets provides powerful control over data integrity, user editing access, and formula protection. Use cell locking cautiously to avoid disrupting workflows or referenced cells. But applied properly, locking cells enables accurate, controlled editing of your critical Sheets data.
Tips for Locking Cells
Here are some tips for effective locking in Google Sheets:
- Lock formulas separately from referenced data ranges
- Use specific cell ranges instead of full columns or rows
- Add conditional formatting to alert when referenced cells are edited
- Lock both formulas and referenced cells
- Hide confidential info like IDs in locked cells
- Limit user access with permissions and sharing settings
- Lock cells early before broadly sharing the sheet
- Store passwords outside Sheets for locked ranges
- Unlock cells when moving them to avoid retaining locks
- Thoroughly test locked cells interactions before sharing
Advanced Cell Locking Techniques
Advanced options for locking cells in Google Sheets include:
- Conditional formatting based on cell values
- Locking cells after data validation rules are set
- Google Apps Scripts to programmatically manage locking
- Protected sheet views showing selective unlocked ranges
- Fully locking sheets then limiting view/comment access
Security Implications of Locking Cells
While locking cells improves security, consider:
- Locking cells can inhibit needed collaboration
- Accidentally locking referenced formula cells
- Communicate purpose of locks to avoid confusion
- Locked cells may impact copying or moving data
- Forgotten passwords can cause access issues
- Full sheet protection may be overly restrictive
- Routinely audit permissions and locks
- Some add-ons may remove locks without warning
FAQ
Q: How do I lock cells in Google Sheets?
A: To lock cells, first select the cells you want to lock. Then go to Format > Lock in the menu bar. This will open the Cell Locking sidebar. Check the box for “Locked” and click “Done”. The selected cells will now be locked.
Q: Can I lock a row or column?
A: Yes, you can lock entire rows, columns or cell ranges in Google Sheets. Just select the row(s), column(s) or cell range before going to Format > Lock.
Q: How do I lock a sheet?
A: To lock an entire sheet, click Data > Protected Sheets and Ranges in the menu. Under “Protected Sheets” select the sheet name, then click “Set Permissions”. Choose which users can edit and click “Save”. The entire sheet will now be locked down.
Q: How do I set permissions for locked cells?
A: In the Cell Locking sidebar, check “Restrict who can edit this cell” and click “Sharing”. Choose which users can still edit the locked cells and click “Save”. Only users with edit access will be able to modify locked cells.
Q: Can I unlock cells if I change my mind?
A: Yes, you can always unlock cells later if needed. Right click on the cell(s) and choose “Unlock”. Or go to Format > Lock and uncheck the “Locked” box. Just be aware unlocking a protected range requires the password if one was set.
Q: What happens if I lock a referenced cell used in a formula?
A: Locking a referenced cell can cause errors in formulas or functions using that cell. It’s best practice to only lock formula cells, while leaving referenced cells unlocked.
Q: Is there a way to automatically lock cells based on certain conditions?
A: Yes, you can use conditional formatting to automatically lock or unlock cells when values meet certain criteria. This allows dynamic cell locking.
Q: Can I restrict editing on only certain sheets in my workbook?
A: Yes, sheet protection allows locking down individual sheets within a workbook. Leave other sheets unprotected for editing.
Q: Where can I learn more about locking cells in Google Sheets?
A: Check out Google’s Help Center article on locking cells for more details. There are also many online tutorials on YouTube and sites like How-To Geek that cover advanced locking techniques.