Uploading photos and documents are often restricted on many sites. Sites do this to ensure that their database of images is not too large not affect the site’s overall performance. The iPhone and Mac allow users to reduce the file size of photos and photocopies directly from their phones.
Increased camera capabilities have resulted in increased file sizes of photos and scans of documents. This picture is suitable for printing. When sharing photos, you need to keep them small to be easier to upload or transfer. Here’s how to shrink those photos if you transfer them from Android to iPhone or Mac and minimize the image size.
Reducing image file sizes is crucial for optimizing storage on devices or for sharing quickly across the internet. Image size reduction helps save storage space, reduce data usage, and speed up sharing your favorite moments captured on iPhone and Mac.
This guide covers multiple techniques to compress your images on iPhone and Mac while retaining quality. We explore built-in tools like the Photos app and Preview app, dedicated third-party software for advanced image optimization, and even automated workflow options. Whether you need to save space on your devices, reduce upload times, or share instantly with friends, there are various ways to resize and compress images easily.
Let’s examine the key methods for reducing file size while maintaining visual quality through adjustments to resolution, dimensions, compression, and file formats (like JPEG, PNG, HEIC). Follow along to master image size reduction on your Apple devices.
Reduce Image Size on iPhone and Mac
Change Camera Capture Format
You may not know that the most common image and video formats are to blame for your pictures taking up so much space. Apple introduced the new High-Efficiency Image Container (HEIC) format as an alternative to JPEG. You may change the camera capture format using HEIC cameras. Follow the instructions below.
Step 1: Go to the iPhone settings app.
Step 2: Click the Camera button.
Step 3: Select High Efficiency in the following menu under Formats.
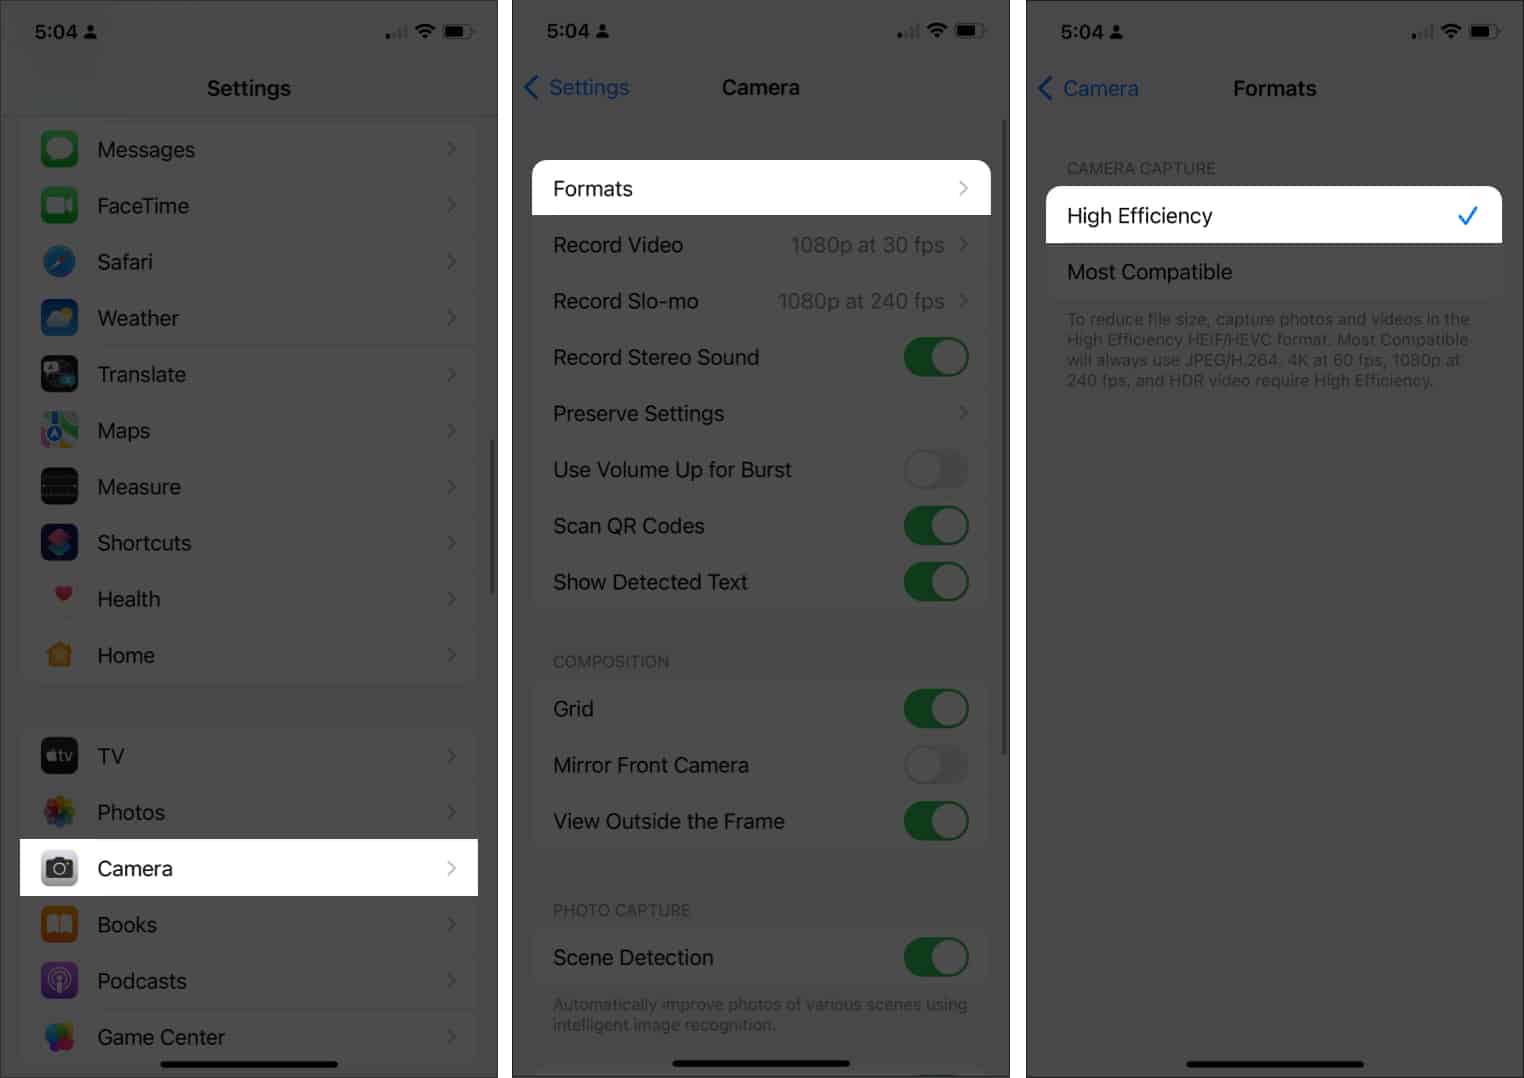
That’s it. From now on, Apple will use the HEIC format to save space and reduce photo file size. Even with a compression process, you will still be able to download these pictures in a couple of MBs.
Send Images to Yourself on WhatsApp or Telegram
Have you noticed that most social media file sizes are smaller than typical files? Pictures uploaded on social media and re-downloaded shrink dramatically. Both photos and videos can reduce in size by using this method on an iPhone.
Open your iPhone’s WhatsApp, create a group, and send yourself your pictures. If you use WhatsApp on your iPhone, you can save the photos directly or use the WhatsApp desktop app on Mac to download the smaller versions.
How to Reduce File Size in mac
You can send photos from an iPhone to a Mac using AirDrop or opt for iCloud, Google Photos, or OneDrive.
Step 1: On Mac, use Image preview by default.
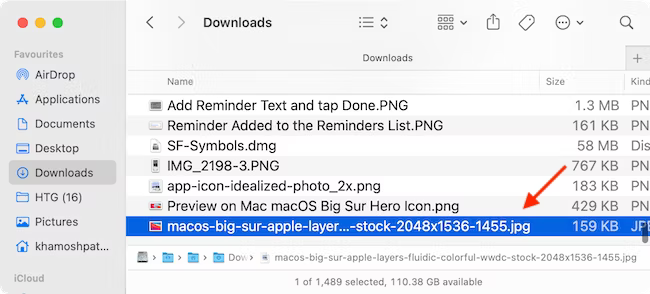
Step 2: You can export the data by choosing Export.
Step 3: macOS will ask you to select the file type and location of the image. Next to the file type, you will find a slider to reduce image size.
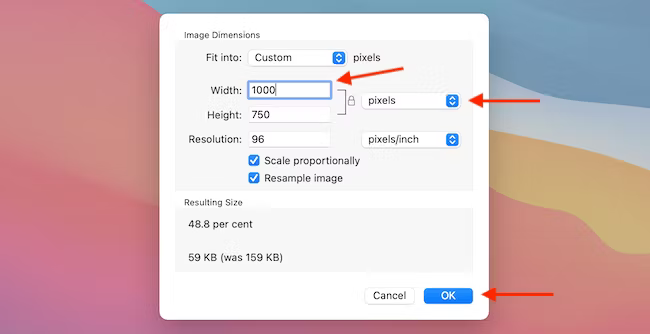
Step 4: With a preset size, the OS calculates an approximate file size for you.
Frequently Asked Questions
Q1: Does Reducing Image Size Degrade Quality?
A: Image compression can utilize both lossy and lossless techniques. Lossless methods condense file size with no quality reduction, while lossy compression minimizes file sizes more drastically but loses some visual data in exchange. When employ carefully, lossy compression generates small files that still appear perfectly crisp to human eyes at normal display resolutions.
Q2: How Do Social Networks Affect Image Quality?
A: Most social platforms recompress images uploaded onto their sites, so overly large files get resized anyways. Target the recommended dimensions and compression levels to avoid double compression artifacts. Let the platform do the work for ideal presentation within its ecosystem.
Q3: Is There a Quick Way to Make Photos Smaller?
A: Yes, simply open images within Apple Photos or Preview apps and adjust the quality slider before export. This provides an easy method for finding a smaller file size versus visual quality balance. This quick quality adjustment can sufficiently optimize filesize with minimal effort for individual images.
Q4: When Editing Images, Should I Save in Png or Jpeg?
A: If you actively edit and wish to preserve quality between sessions, use lossless PNG format to retain all image data with no degradation compared to lossy JPEGs. But for final optimized files meant for distribution, JPEGs produce much smaller files.
Q5: What Causes Image Files to Be So Large?
A: Factors like high resolution, dimensions, bit depth, metadata and inefficient compression all increase file size. Lowering resolution is the most impactful way to reduce filesize, followed by adjustments to dimensions, metadata removal and conversion to more optimized formats like HEIC or carefully compressed JPEGs.
Q6: How Can I Tell if an Image is Properly Compressed?
A: View detailed file information and note anomalies like much larger file sizes than expected based on resolution and dimensions. Open an image in editor software and check for compression artifacts like banding, blurriness or checkerboard patterns, which indicate extreme quality loss from excessive compression.
Conclusion
Reducing image files to smaller sizes can provide essential savings in storage capacity and sharing bandwidth. Fortunately, iOS and macOS offer several streamlined tools integrated directly into apps like Photos and Preview for manually tweaking compression, dimensions, and more on individual files.
For managing entire collections, automated optimization software can batch-process images via preconfigured workflows for consistent right-sized output. Test various quality levels and visual results when balancing file size constraints with aesthetic considerations.
Following the guidelines in this guide will help you ably harness the image processing capabilities already available natively in Apple’s ecosystem. With practice identifying the most impactful adjustments for your needs, resizing images effectively will soon feel familiar. Take control of unwieldy photo libraries and unnecessarily large files slowing down backups or uploads. Take advantage of the performance latent in your iPhone and Mac hardware when editing media by converting bloated pictures into far more portable formats optimized for sharing instantly.