Do you want to create a hard drive partition in your Windows 10 or 11 systems? Usually, the Hard Drives come with a single collated storage memory that is divided into multiple partitions. You can even use this partition to organize or manage your data into multiple virtual drive volumes. The partition can also help you to recover data from the formatted or deleted drives.
Partitions on the hard drive are important to protect important data, especially when the hard drive gets attacked by a virus. In Windows OS, partitions of Hard Drive directly refer to drivers and generally have a letter associated with it as an indicator. Go through this article to get help on how to create a partition in Windows 10/11.
Why Create Partitions of a Hard Drive in Windows OS?
Creating partitions of a Windows 10/11 Hard Drive offers several advantages. It is good to keep the Operating System or the system files in their own separate drive or partition. If you have your OS stored in a separate drive, you can access all its data even when you reset your device.
If the size of the Hard drive is less, like 128GB or 256GB, then there is no need to make any more partitions. In contrast, if the size of hard drive is 500GB to 2TB, then you can make as many partitions as you require.
Effective Steps to Partition a Hard Drive in Windows 11/10
There are multiple methods on how to create partitions in Windows 11/10 system. Even there is some popular partition recovery software that makes it easier for users to create the partition. However, Windows built-in tool, Disk management, is quite easy to use for partitioning a hard drive.
Given below are some simple steps that will help you to know how to partition a hard drive using the built-in tool:
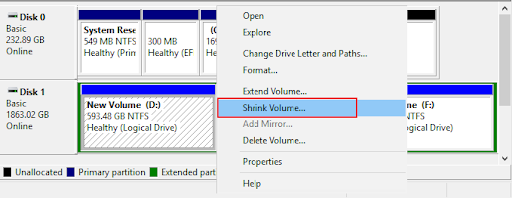
- To create partitions, you need to open the Disk Management tool. For this, right-click on the My Computer icon on the desktop and then select Manage.
- Select and right-click on the hard disk that you want to partition.
- From the list of options that appear on the screen, select “Shrink Volume”.
- A pop-up window will appear on the screen. In this pop-up window, you need to enter how much modification you want in the space.
- Once done, click on the “Shrink” button located at the lower right corner of the pop-up window.

- After completion of the process, you can notice an unallocated space in the disk that you have chosen. Right-click on this unallocated space. A set of options will then appear on the screen, from which you need to select “New Simple Volume”. Go through the on-screen instructions to format and partition the new volume.

The above steps will help you in creating partitions on the hard drive of your Windows 10/11 device.
Using CMD to Create Partition in Windows 11
If you want to format an existing partition or modify the volume format to a new file system, apply the below-given steps:
- Press the Win + R keys to open the Run prompt. Type cmd and press Ctrl +Shift + Enter.

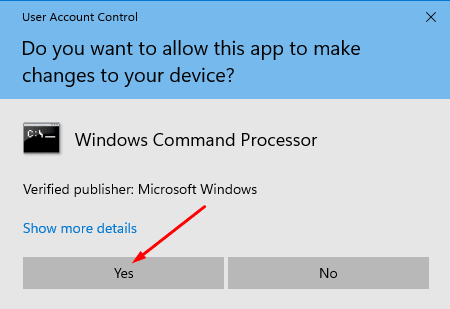
- From the “User Account Control” pop-up, click “Yes”.
- Type “diskpart” in the Command Prompt. Press the Enter key.

- In the new window, type the “list disk” command and press Enter.

- Type Select Disk DiskNumber (Here you need to enter the Disk number in place of DiskNumber).
- Provide the following command “Create partition primary size=PartitionSize” (Replace PartitionSize with the value that you want). Press Enter.

- Write “Assign letter=DriveLetter” (Here DriveLetter is a drive that is not already used).
- Enter Exit to complete the process.
Tool That Makes the Partitioning Easier
Instances may arise when the Windows built-in Disk Management tool may not be enough to do the partition tasks. In such cases, you should try any third-party software do to the partition task. There are multiple partitioning wizards available that can make the process to partition the hard drive in Windows 11/10 quite easier.
Here we have recommended software that you can download to have a simple and quick partitioning task:
Stellar Data Recovery Professional Software
Stellar Data Recovery Professional program helps users to recover any data lost from partitioning or formatting the hard disk. It is the best tool, especially when you are suffering from heavy data loss. This tool allows users to recover deleted files from HDDs, SSDs, USB, and optical media. You can even restore data from formatted, encrypted, or corrupted drives using this tool.
What Makes Stellar Data Recovery Professional Unique?
It is an all-in-one professional data recovery software that recovers data from Windows storage media. It retrieves data from lost partitions and RAW drives. You can easily recover your files from CD/DVD, HD DVD, and Blu-ray Disc. The software recovers almost all File types and Formats, including documents, emails, photos, videos, audio, etc.
Pre-requisites for Partitioning Your Hard Drive
There are certain important things that you need to take care of before partitioning your hard drive. Firstly, make sure that you are partitioning the right disk before you start the steps mentioned in this step-by-step tutorial. For example, if you have to partition disk C, then you need to click on disk C.
Always back up your important files such as photos, videos, documents, etc. before you create partition on Windows 11/10 computer.
Conclusion
In this article, we have mentioned how to partition a hard drive in Windows 11/10. You can use these methods to create a partition on the Windows system. But before you partition a hard drive, it is important to create a backup of your data, so you can access your data when required.
If you forgot to back up your files, don’t panic. You can use an efficient data recovery tool, like Stellar Data Recovery for Windows. This software can help you in recovering data from deleted, formatted, or even corrupted hard drive partitions.