Snapping windows side-by-side on a Mac allows you to multitask more efficiently by viewing two apps simultaneously. This can boost your productivity when researching, comparing documents, referencing data, and more.
macOS includes a built-in “Split View” feature that lets you snap windows side-by-side. You can also use third-party tools like Magnet, BetterSnapTool, Rectangle, and Divvy to customize the experience further. This article will showcase different methods for accomplishing split screen on a Mac.
Multitasking is key in our digital world, but working with too many open windows can sometimes feel chaotic. Cluttered desktops quickly diminish our focus and productivity. Wouldn’t it be useful to snap related windows side-by-side to streamline workflows?
Fortunately, macOS offers a slick built-in feature called Split View to arrange two apps neatly next to each other. This enables you to research topics in Safari while compiling notes in the Notes app, scan your calendar while crafting emails, mix audio tracks while tweaking playlists, and more.
Beyond Apple’s split screen implementation, third-party utilities like Magnet and Rectangle provide advanced window management and custom snapping behaviors too. You can pave the way for organized multi-app usage with just a few clicks or drags.
This article will guide you through the quickest ways to snap windows on your Mac for optimized split screen sessions. You’ll learn to use Split View, snap into full-screen mode, customize sizes, save layout presets, and leverage handy keyboard shortcuts. These tips will help declutter your workspace and streamline using multiple apps fluidly side-by-side.
Let’s get started maximizing screen real estate with neat split-view window arrangements! When working on related tasks across apps, this can make a noteworthy difference in daily productivity.
What Split View is and How It Works
Split View is a native macOS feature that enables snapping two windows side-by-side, thereby displaying two apps simultaneously for enhanced multitasking.
To activate it, click and hold the full-screen button in the upper-left corner of a window then drag that window left or right to snap against the screen edge. This will automatically snap a second window into the available space.
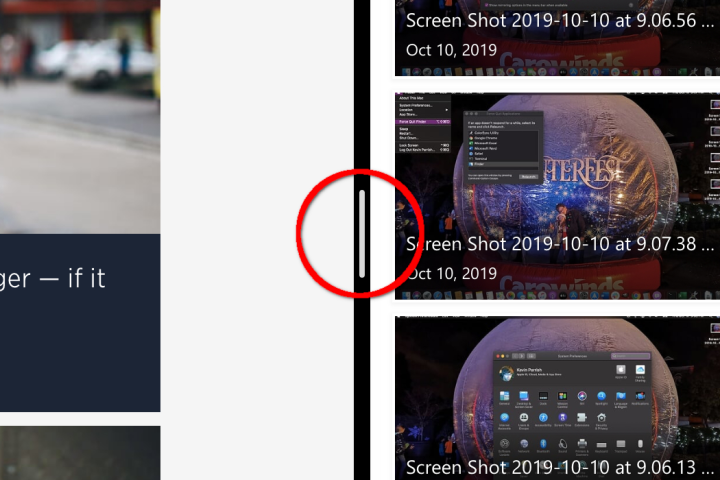
You can then easily resize either window’s width by dragging the divider in the middle. macOS will remember the Split View arrangement for future usage. This keeps relevant apps neatly organized for efficient workflows.
Using macOS Split View
The easiest way to snap two windows on a Mac is by using Split View – a native macOS feature for viewing two apps side-by-side. Here are three quick methods to activate it:
Method 1: Green Button & Drag
1. Open two apps and adjust their size/position.
2. Hover over the green full-screen button in the upper-left corner of a window.
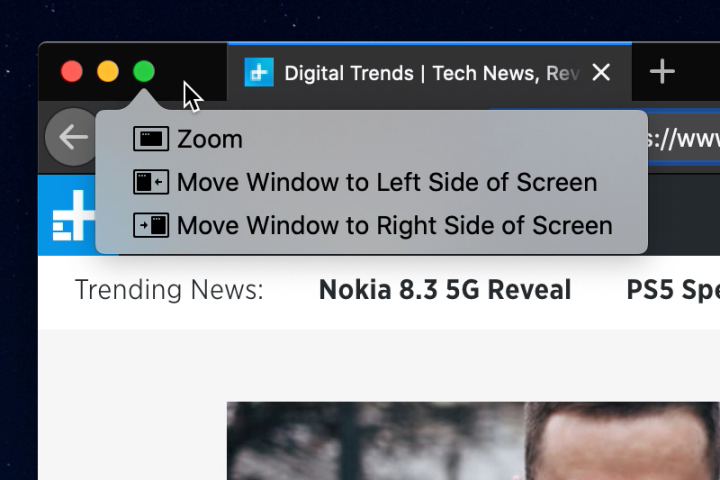
3. Hold down the Option key, click the green button, and drag that window left/right.

4. Release the mouse and Option key to snap the windows side-by-side.
Keyboard maestros can use Control + Option + Left/Right Arrow to initiate snapping via keyboard.
Method 2: Mission Control
Mission Control offers an overview of open windows/desktops and enables arranging apps spaces conveniently.
1. Open Mission Control using the keyboard shortcut Control + Up Arrow or by swiping up with three fingers on a trackpad.
![]()
2. Drag one window onto another window thumbnail in the Spaces overview. This will snap the windows side-by-side when you release.
Method 3: Full-screen Apps
You can conveniently snap a window alongside full-screen apps too:
1. First set an app to full-screen by clicking the green button or using Control + Up Arrow.
![]()
2. Next, hover over the green button for the window you want to snap and press the Up Arrow.
![]()
This will instantly snap the window next to the full-screen app.
Customizing Split View
Once you have two windows snapped, you can customize the experience further:
- Adjust the window divider to resize either view as needed
- Hide the menu bar for a distraction-free effect
- Switch between apps by clicking their Sierra thumbnail in Split View
For optimal Split View usage, position apps that complement each other like Safari + Notes or Mail + Calendar side-by-side. This enables seamless research, checking references, compiling data, and more.
Third-Party Snapping Tools
While Split View offers the essential snapping behaviors, third-party utilities provide advanced customizations for power users:
Magnet

This popular tool enables snapping windows via customizable keyboard shortcuts or dragging windows to screen edges. Handy features include window saving/restoring, multiple display support, snap presets, window alignment, and integration with Spaces.
BetterSnapTool
BetterSnapTool expands the native snapping abilities in macOS by letting you snap windows into preset size ratios. You can save window positions, set snap areas, create keyboard shortcuts, integrate with Spaces/Exposé, and more.
Rectangle

Rectangle focuses on keyboard-centric window management. It enables moving and resizing windows using shortcuts. Nifty features include window presets, Spaces integration, Divvy-style window arrangements, snap areas, and customizable behaviors.
Divvy
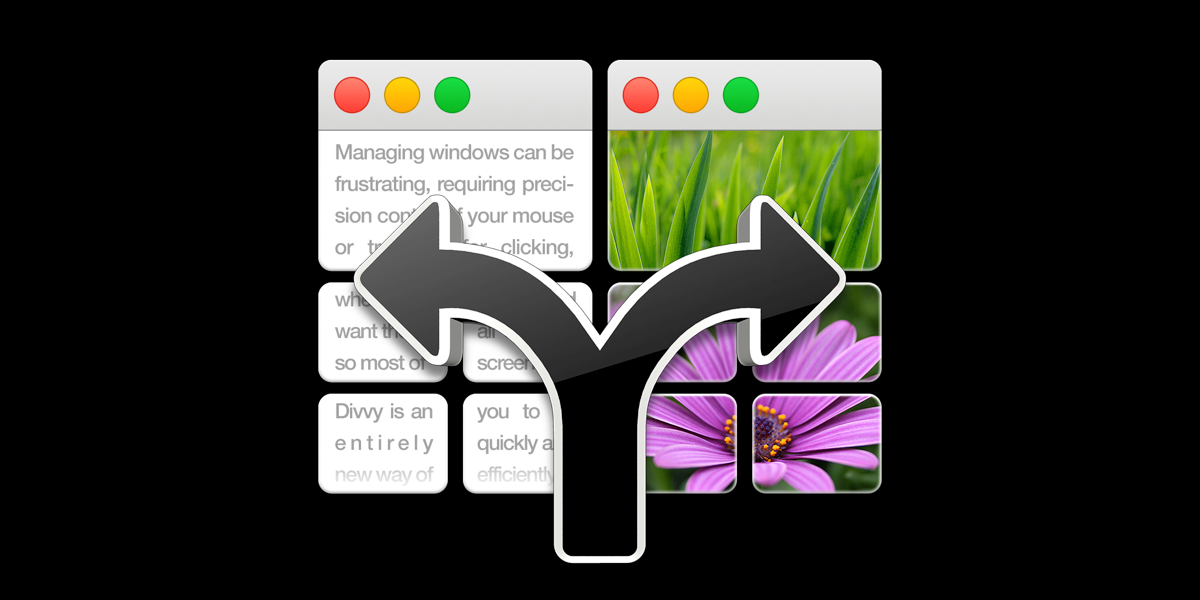
Divvy takes a highly customizable approach to window management. Configure custom snap areas, apply sizing presets, set up shortcuts, save layouts, integrate with Spaces, and script window behaviors exactly as needed.
While Magnet and BetterSnapTool offer free versions, Rectangle and Divvy require paid licenses. However, all of them provide free trials for evaluating these capable utilities.
Additional Tips
- Quickly enter Split View by dragging a window to the left/right screen edge. Exit by dragging back from the edge.
- Drag a window to the corresponding display edge to snap windows across multiple displays.
- Under System Preferences > Mission Control, customize behaviors related to Split View, Spaces, and full-screen apps.
- Check Apple Support, Mac forums, and online tutorials for more help with snapping windows. Useful web search queries include “Mac split screen,” “Mac split view,” and “Mac side by side.”
Frequently Asked Questions
Q1: How Do I Snap Windows When One App is in Full Screen Mode?
A: Hover over the green full screen button in the window you want to snap, then press the Up Arrow key to activate Split View next to the full screen app.
Q2: Can I Save a Split View Window Arrangement for Later?
A: Yes, you can save split screen layouts as window presets in tools like Magnet, Rectangle and Divvy for one-click restoring.
Q3: Why Do My Snapped Windows Not Share Space Equally by Default?
A: macOS gives preference to the most recently focused window in Split View. But you can easily drag the divider to adjust the window sizes.
Q4: How Do I Exit Split View?
A: Drag a window away from the edge to unsnap it or click the Full Screen button to exit Split View and return the app to a regular window.
Q5: What Happens if I Maximize One App in Split View?
A: Maximizing one app will automatically minimize the other app. To view both side-by-side again, click the window thumbnail in the Dock or press Command+Tab.
Q6: Can I Snap More Than Two Windows at Once?
A: Most tools are limited to two windows in split view. But Divvy supports creating complex multi-window arrangements across displays.
Conclusion
Snapping windows side-by-side boosts your productivity when multitasking on a Mac. The native Split View feature offers the basics while third-party tools provide advanced customizations. Experiment with the different methods showcased here to find your ideal workflow. This will enable you to make the most of your display real estate by keeping complementary apps neatly arranged in split view.