
In the bustling realm of your Microsoft Outlook Inbox, emails come pouring in like a fierce storm, threatening to drown you in a sea of information. But fear not, for within this digital chaos lies a solution—a beacon of organization and clarity.
The art of archiving emails in your Microsoft Outlook Inbox is the key to taming this tempest, allowing you to find serenity amidst the storm. Picture this: your Inbox, a pristine sanctuary where only the most important and relevant messages reside. By archiving emails, you can symbolically sweep away the clutter and noise, preserving only what truly matters.
With a few simple steps, you can transform your Outlook experience from overwhelming to streamlined, ensuring that every email finds its rightful place in the vast landscape of your digital domain. So, grab your virtual broom, and let’s embark on this journey of email archiving in Microsoft Outlook Inbox.
How to Archive Emails in Microsoft Outlook Inbox
Archiving emails in Microsoft Outlook’s inbox is a simple and efficient way to declutter your mailbox and ensure that important messages are easily accessible at a later date. Archiving allows you to move older or less important emails to a separate folder instead of leaving all your emails in the inbox, where they can pile up and make it difficult to find what you need.
This not only helps you stay organized, but it also improves the performance of Outlook by reducing the size of your mailbox.
To archive emails in Microsoft Outlook, select the ones you want to archive and click the ‘Archive’ button. This will automatically move the selected emails to the archive folder, keeping them out of your inbox while still preserving them for future reference.
Archiving is especially useful for emails that you may not need to access frequently but want to keep for record-keeping or compliance purposes.
By archiving your emails, you can maintain a clean and clutter-free inbox while still having easy access to important messages when needed. Archiving is a valuable tool for managing your email effectively and keeping your mailbox organized.
Now that you know how to archive emails in Microsoft Outlook, let’s explore the archive feature and how it works.
What is archive in Outlook? It is a separate folder where you can store emails that you don’t need in your inbox anymore but still want to keep for future reference. Archiving helps you declutter your inbox without permanently deleting emails. It provides a convenient way to preserve important messages while maintaining a streamlined and efficient email management system. With the archive feature in Outlook, you can keep your inbox tidy and easily locate archived emails whenever you need them.
What is Archive in Outlook?
When you want to declutter your digital space and organize your important messages for future reference, think of Outlook’s secret hiding place for your cherished electronic correspondence. This magical place is called the Archive folder. Just like a physical filing cabinet, the Archive folder in Outlook allows you to store away emails that you don’t need in your Inbox but still want to keep for later. It’s like having a separate storage room for your emails, where you can access them whenever you need to, without cluttering your main Inbox.
To help you visualize this concept, imagine a table with two columns and three rows. In the first column, you have your Inbox, filled with all your incoming emails. This is where you receive and read your messages. In the second column, you have the Archive folder. This is where you move your emails when you no longer need them in your Inbox but want to keep them for future reference. The Archive folder acts like a digital filing cabinet, neatly organizing your emails so you can easily find them later. It’s a great way to keep your Inbox clutter-free and still have all your important emails at your fingertips.
Now that you understand the Archive folder in Outlook, let’s move on to the next section about the manual archive method. This method allows you to select and move specific emails to the Archive folder manually. It gives you more control over which emails you want to keep and which ones you want to delete. So, if you’re ready to learn how to archive your emails manually, let’s dive right in.
Manual Archive Method
To better manage your digital space, you can take control of organizing your essential messages by manually selecting specific emails to store away for future reference in Outlook’s Archive folder. This manual archive method allows you to declutter your inbox while still keeping essential emails accessible when you need them.
By archiving emails, you can create a streamlined and efficient inbox containing only the most relevant and current messages.
To start archiving your emails, the first step is to open Microsoft Outlook. Once you have Outlook open, you can proceed to the next steps of the manual archive method.
Opening Outlook is simple and quick—locate the Outlook icon on your desktop or in your taskbar and click on it. Once Outlook is open, you will be ready to begin archiving your emails.
By manually archiving specific emails in Outlook, you can ensure that your inbox remains clutter-free while still keeping important messages at your fingertips. Take control of your digital space by following the simple steps to archive your emails.
Now that you have Outlook open, let’s move on to the first step of the manual archive method.
Step 1: Open Microsoft Outlook
Once you’ve located the familiar Outlook icon, click on it to open up the world of organized digital communication. Outlook provides a user-friendly interface that allows you to manage your emails efficiently. It is an essential tool for both personal and professional use.
Here’s how to archive your emails in Microsoft Outlook inbox:
- The first step is to open Microsoft Outlook. This can be easily done by clicking on your desktop’s Outlook icon or searching for it in the Start menu. Once you click the icon, Outlook will launch, and you’ll be greeted with your inbox.
- After opening Outlook, you’ll see a list of emails in your inbox. This is where you receive all your incoming messages. The inbox is the central hub for your email communications. To archive emails, navigate to the inbox section, which is usually located on the left-hand side of the Outlook window.
- To find the inbox, look for the folder pane on the left-hand side of the Outlook window. It usually displays a list of folders such as Inbox, Sent Items, Drafts, and more. Click on the Inbox folder, and it’ll open, displaying all the emails you’ve received. Now you’re ready to proceed with archiving your emails.
You’ve taken the first step towards archiving your emails by opening Microsoft Outlook. Now that you’ve successfully accessed your inbox, you can continue with the next step of the process.
Step 2: Navigate to the Inbox
As you explore the world of organized digital communication, the next step is to easily navigate to the hub of your email communications. In Microsoft Outlook, the hub is the Inbox, where all your incoming emails are stored.
To navigate to the Inbox, click on the ‘Inbox’ option located on the left-hand side of the Outlook window. This will instantly take you to the central location where you can access all your emails.
Once you are in the Inbox, you’ll see a list of your most recent emails. The Inbox is organized with the most recent emails at the top, making it easy to find and access your latest messages quickly.
You can scroll through the list to view older emails or use the search function to locate specific messages. By familiarizing yourself with the Inbox, you’ll be able to efficiently manage your emails and stay on top of your digital communication.
Now that you’ve successfully navigated to the Inbox, the next step is to select the emails you want to archive. Archiving emails helps to declutter your Inbox and keeps your important messages organized for future reference.
By selecting emails to archive, you can move them to a separate folder or a designated archive folder, making it easier to find them later on. So let’s move on to step 3 and learn how to select emails to archive in Microsoft Outlook.
Step 3: Select Emails to Archive
You can easily declutter your email in your Inbox by selecting specific messages to archive. This helps keep your digital communication organized and efficient. Did you know that, according to a study, the average person receives 121 daily emails? It’s crucial to manage and archive important messages effectively.
To select emails for archiving, follow these steps:
– Click on the first email you want to archive.
– Hold down the Shift key on your keyboard.
– While holding down the Shift key, click on the last email you want to archive.
– All the emails between the first and last one you selected should now be highlighted.
By selecting specific emails to archive, you can quickly clear your Inbox of unnecessary clutter. This makes it easier to find and prioritize important messages. Once you’ve selected the emails, you can proceed to the next step and click on the ‘archive’ button to move them out of your Inbox and into the archive folder. This simple process will help you maintain a well-organized and efficient email system.
Step 4: Click on the “Archive” Button
To efficiently manage your digital communication, click the ‘Archive’ button after selecting the desired emails. This action will effectively organize and declutter your email system, ensuring that important messages are stored for future reference while keeping your inbox clean and easy to navigate.
Archiving emails is a quick and convenient way to maintain a streamlined workflow, allowing you to focus on the most relevant and current correspondence. Clicking on the ‘Archive’ button in Microsoft Outlook will instantly move the selected emails to the designated archive folder. This folder is a separate storage space for emails you want to keep but don’t need to access frequently. Moving these messages out of your inbox can reduce clutter and improve overall email organization. It’s a simple yet powerful feature that significantly impacts your productivity and email management efficiency.
With just a click, you can archive multiple emails at once, saving you time and effort. Once you have archived the selected emails, you can proceed to the next step: choosing archive settings. By customizing these settings, you can optimize your email archiving experience and ensure that the archived messages are stored in a way that suits your preferences.
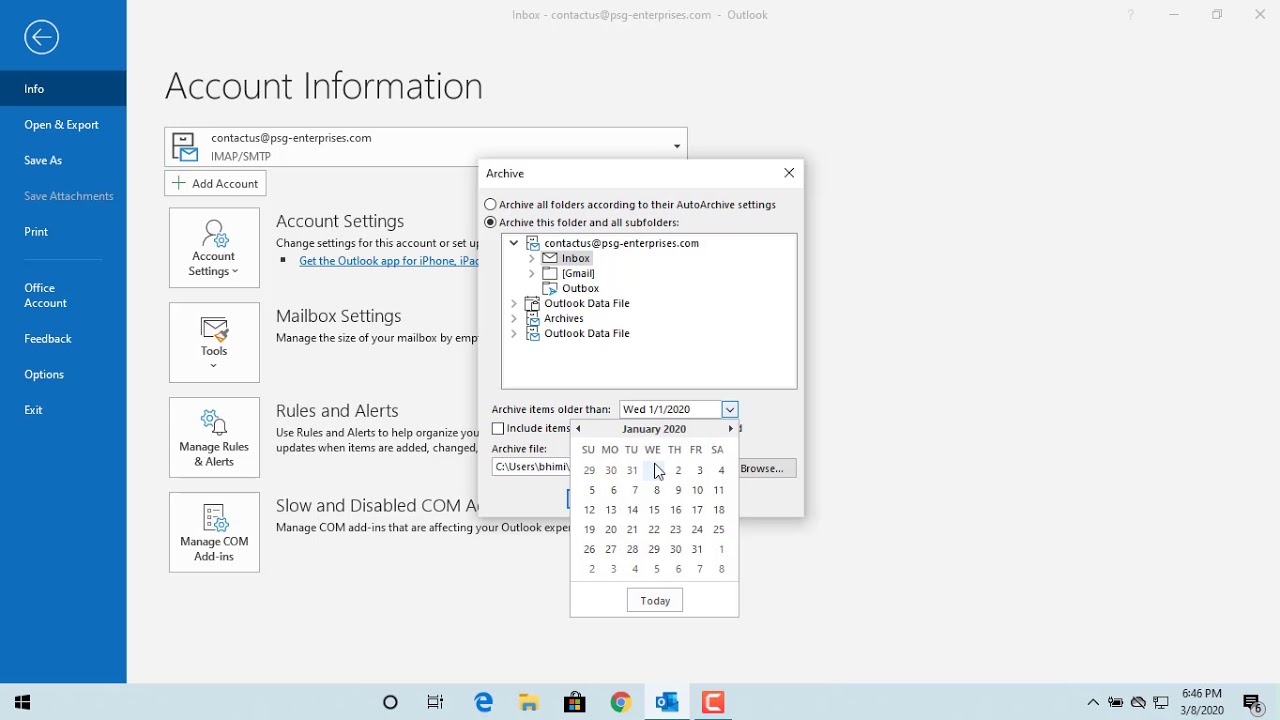
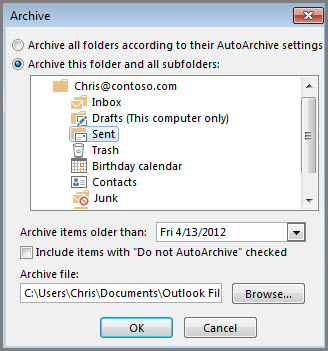
Step 5: Choose Archive Settings
Customize your preferences for storing archived messages by selecting archive settings. In Microsoft Outlook, you have the option to choose how you want your emails to be archived. By accessing the archive settings, you can determine the location where your archived messages will be stored and set specific criteria for when emails should be automatically archived. To access the archive settings, follow these steps:
- In the Outlook toolbar, click on the “File”tab.
- From the drop-down menu, select “Options.”
- In the Outlook Options window, click on the “Advanced”tab.
Once you’ve reached the archive settings, you’ll see a table where you can customize various options. Here’s an example of how the table might look:
| Archive | Description |
| Default | Archives items based on the default settings determined by Outlook. |
| Do Not Archive | Prevents any email from being automatically archived. |
| Archive This Folder and Subfolders | Archives items in the selected folder and its subfolders. |
| Archive Items Older Than | Specifies a date for automatically archiving emails older than a certain timeframe. |
By selecting the appropriate options in the table, you can tailor the archive settings to meet your specific needs. Once you’ve customized your preferences, you can proceed to the next section to learn about the automatic archive method.
In the next section, we will explore the automatic archive method, which allows you to set up Outlook to archive emails according to your specified criteria automatically. This method can be a great time-saver, as it eliminates the need for manually archiving each email. So, let’s move on to learn how to set up the automatic archive method in Microsoft Outlook.
Automatic Archive Method
The automatic archive method in Microsoft Outlook streamlines organizing and managing your email messages, allowing you to prioritize and declutter your inbox effortlessly. With this method, Outlook automatically moves older emails from your inbox to a designated archive folder based on your chosen settings. This ensures that your inbox remains clutter-free and only contains the emails that are most relevant to you at the present moment.

You can customize the settings according to your preferences to set up the automatic archive method. First, you can specify the timeframe for Outlook to consider an email as ‘old’ and ready for archiving. This can be certain days, weeks, or even months. Second, you can choose the folder where Outlook should move the archived emails. It can be a specific folder within your mailbox or even a separate archive file. Lastly, you can select whether to include or exclude certain folders from the archiving process. This allows you to focus only on the folders that are important to you.
Utilizing the automatic archive method in Microsoft Outlook, you can effortlessly keep your inbox organized and clutter-free. This feature benefits those who receive a large volume of emails daily and need a system to manage their messages effectively. Now that you understand the benefits of the automatic archive method, let’s move on to the first step of the process: opening Microsoft Outlook.
(Note: The subsequent section will guide you through the steps of opening Microsoft Outlook.)
(Note: The subsequent section will guide you through the steps of opening Microsoft Outlook.){finish the sentence} Let’s begin by locating the Microsoft Outlook icon on your computer’s desktop or in the Start menu.
Step 1: Open Microsoft Outlook
First, locate the icon for Microsoft Outlook on your computer’s desktop or in the Start menu. Simply double-click on the icon to open the program.
Once Microsoft Outlook is open, you will see your inbox displayed on the screen. This is where all your incoming emails are stored.
Now that you have successfully opened Microsoft Outlook, you can proceed to the next step and access the autoarchive settings.
To access the autoarchive settings, go to the top menu bar and click on the ‘File’ tab. A drop-down menu will appear, and you need to select ‘Options’ from this menu. Once you click on ‘Options’, a new window will open with various settings for Microsoft Outlook.
Look for the ‘Advanced’ tab in this window and click on it. Here, you will find the ‘AutoArchive’ section, which is where you can set up automatic archiving for your emails.
Now that you have accessed the autoarchive settings, you can customize the frequency and location of your archived emails. By clicking on the ‘AutoArchive Settings’ button within the ‘AutoArchive’ section, you can choose how often you want Outlook to archive your emails automatically. You can also specify the folder where the archived emails will be stored.
Once you have made these adjustments, click on the ‘OK’ button to save your changes. With the autoarchive settings configured, Outlook will automatically archive your emails based on your preferences.
With Microsoft Outlook open, you are ready to access the autoarchive settings. First, locate the icon for Microsoft Outlook on your computer’s desktop or in the Start menu.
Once you have opened Outlook, go to the ‘File’ tab in the top menu bar and select ‘Options.’ From there, navigate to the ‘Advanced’ tab and find the ‘AutoArchive’ section.
Click on the ‘AutoArchive Settings’ button to customize the frequency and location of your archived emails.
Step 2: Access the AutoArchive Settings
To access the autoarchive settings, navigate to the ‘Options’ tab in the top menu bar of Microsoft Outlook, like finding a hidden treasure chest in a vast sea of settings.
This tab is located at the top of the Outlook window, next to the ‘File’ tab. Click on the ‘Options’ tab to reveal a drop-down menu with various settings and configurations.
Once you have accessed the ‘Options’ tab, scroll down until you find the ‘Advanced’ section. You will see a button labeled ‘AutoArchive Settings’ in this section. Click on this button to open the AutoArchive settings window.
Here, you can configure how Outlook archives your emails, including the frequency of archiving, the location of the archived files, and the option to delete old items instead of archiving them.
Accessing the AutoArchive settings makes you one step closer to effectively managing your Outlook inbox.
In the subsequent section about configuring autoarchive options, you’ll be able to tailor the settings to best suit your needs. Whether you want to automatically archive emails older than a certain date or specify a different location for the archived files, the AutoArchive settings allow you to take control of your inbox and keep it organized.
Step 3: Configure AutoArchive Options
Now let’s dive into customizing your AutoArchive options to effortlessly manage and organize your emails in a way that suits your preferences.
To configure your AutoArchive options, follow these steps:
- Choose the frequency: Decide how often you want Outlook to archive your emails automatically. You can select options like every day, every week, or every month. This lets you keep your inbox clutter-free and ensures that important emails are always accessible.
- Set the age of items to archive: Determine how old an email needs to be before it’s archived. You can choose a specific number of days or even specify a certain date. This way, you can prioritize recent emails while safely storing older ones.
- Choose the location: Select the folder where your archived emails are stored. You can create a new folder for archived emails or choose an existing one. This ensures that your archived emails are easily accessible and organized.
Customizing these AutoArchive options allows you to manage your emails and keep your inbox tidy.
Once you’ve configured your preferences, you can proceed to the next step and enable AutoArchive for your inbox. This’ll ensure that your emails are automatically archived according to your chosen settings, making it easier to find and organize your messages.
Step 4: Enable Auto archive for the Inbox
Once you enable AutoArchive for your inbox, you’ll experience a sense of relief as your cluttered digital world transforms into a blissfully organized oasis. Enabling AutoArchive for your inbox allows Microsoft Outlook to automatically move older emails from your inbox to a designated archive folder, helping you declutter your inbox and improve its performance.
To enable AutoArchive for your inbox, open Microsoft Outlook and go to the File tab. Next, select Options and then click on the Advanced tab.
In the AutoArchive section, click on the AutoArchive Settings button. This will open the AutoArchive dialog box where you can configure the settings for AutoArchive.
In the AutoArchive dialog box, you can choose the frequency at which AutoArchive runs and the age of the emails to be archived. To enable AutoArchive for your inbox, select the ‘Run AutoArchive every’ checkbox and set the desired number of days. You can also choose whether to permanently delete expired items or move them to the Deleted Items folder.
Once you have configured the settings to your preference, click OK to save the changes.
From now on, Outlook will automatically archive older emails in your inbox according to the configured settings, keeping your inbox organized and clutter-free.
Frequently Asked Questions
1. Can I Archive Specific Emails Based on Certain Criteria, Such as Sender or Subject?
Yes, you can definitely archive specific emails in Microsoft Outlook based on certain criteria like the sender or subject. Outlook provides you with various options to set up rules and filters that automatically move specific emails to your archives.
By creating a rule, you can specify conditions such as the sender’s email address or the subject line, and then choose to move those emails to a specific folder or archive. This way, you can easily organize and manage your inbox by automatically archiving emails that meet your specific criteria.
2. Can I Set Up Different Archive Folders for Different Categories of Emails?
‘Variety is the spice of life!’ And when it comes to organizing your emails, Microsoft Outlook offers you the flexibility to do just that. You can set up different archive folders for different categories of emails, allowing you to keep your inbox tidy and easily locate what you need.
Whether it’s creating separate folders for work, personal, or specific projects, Outlook’s archiving feature lets you customize your email management experience. So embrace the power of organization, and create your own email oasis with Outlook’s versatile archiving options.
3. Will Archived Emails Still Be Accessible and Searchable in Outlook?
Archived emails in Microsoft Outlook will still be accessible and searchable. When you archive an email, it is moved from your inbox to a separate folder designated for archived emails.
However, you can still search for these archived emails whenever you need them. Outlook provides a search function that allows you to easily find specific emails, even if they’ve been archived.
So, don’t worry, you won’t lose access to your archived emails. They’ll still be searchable within Outlook
4. Can I Choose to Archive Emails From Multiple Folders at Once?
Yes, you can choose to archive emails from multiple folders at once in Microsoft Outlook. By selecting the folders you want to archive, you can efficiently organize and store your emails without manually archiving each one.
This feature allows you to save time and effort, streamlining the archiving process and ensuring that your emails are stored in a way that’s easily accessible and searchable whenever you need them.
So, whether you have emails scattered across different folders or want to archive emails from various sources, Outlook offers a convenient solution to help you manage and organize your inbox effectively.
Can I Schedule Automatic Archiving to Occur at Specific Intervals?
Yes, you can schedule automatic archiving to occur at specific intervals in Microsoft Outlook. By going to the File tab, selecting Options, and then clicking on Advanced, you can access the AutoArchive settings.
From there, you can choose the frequency and specific folders you want to automatically archive. This feature allows you to effortlessly keep your inbox organized and free up space on your server.
By setting up automatic archiving, you can focus on your important emails while ensuring that older messages are safely stored away.
Conclusion
In conclusion, archiving emails in Microsoft Outlook Inbox is like organizing your virtual world into a neat and orderly library. Just as a librarian carefully catalogs books, you can archive your emails to ensure easy access and declutter your Inbox.
It’s like opening the doors to a hidden treasure chest, where you can rediscover important messages or memories from the past.
Think of your Inbox as a bustling city, filled with emails rushing in and out like busy commuters. Archiving is like constructing a peaceful oasis within this chaotic cityscape. By following the simple steps outlined in this article, you can create a tranquil haven where you can easily find and retrieve your archived emails whenever you need them.
So, why not take a moment to embark on this journey of organization and tranquility? Start archiving your emails today and experience the joy of a clutter-free Inbox. Remember, just like a well-organized library, an archived email is a treasure waiting to be rediscovered.