Are you tired of using Skype for Business on your Windows 10 computer? Whether you find it unnecessary or prefer using other communication platforms, you can disable or completely uninstall Skype for Business. In this article, we will guide you through various methods to achieve this, allowing you to regain control over your computer’s communication tools.
Firstly, we will walk you through completely uninstalling Skype for Business from your Windows 10 system. We will provide step-by-step instructions on how to remove it using the Control Panel and Registry Editor. Additionally, we will explore a silent-uninstall method using a custom config and introduce you to third-party uninstallers that can efficiently remove Skype for Business from your computer. By following these methods, you can free up valuable space on your system and eliminate any unwanted traces of the application.
However, we will also cover that option if you prefer to keep Skype for Business on your computer but want to disable it temporarily. We will show you how to disable Skype for Business through the application’s settings, allowing you to prevent it from running in the background and consuming system resources.
Whether you uninstall or temporarily disable Skype for Business completely, this article will provide you with the knowledge and tools to take control of your Windows 10 computer and tailor it to your communication preferences.
Disable or Completely Uninstall Skype for Business From Windows 10
Did you know that over 1 billion people use Windows 10 worldwide? If you want to disable or completely uninstall Skype for Business from your Windows 10 device, here’s how you can do it.
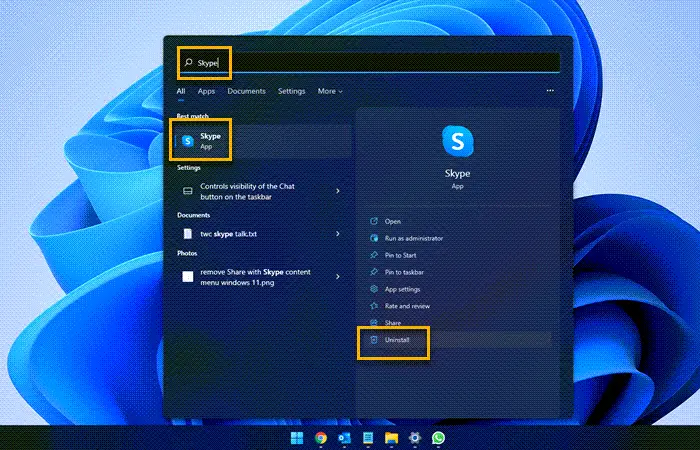
First, open the Start menu by clicking on the Windows icon at the bottom left corner of your screen. From there, scroll through the list of installed applications until you find Skype for Business. Right-click on it and select ‘Uninstall’ from the drop-down menu. Follow the on-screen prompts to complete the uninstallation process.
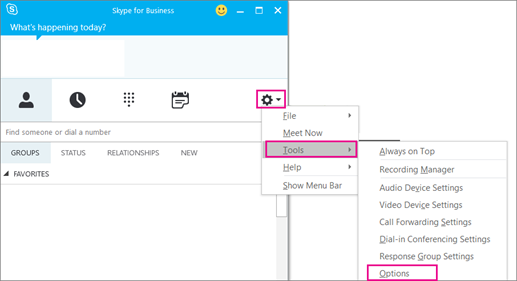
Next, you may also want to disable Skype for Business from starting up automatically when you turn on your computer. To do this, open the Skype for Business application and sign in with your credentials. Once signed in, click on the gear icon in the top right corner to access the settings menu. From there, select ‘Tools’ and then ‘Options’. In the options menu, navigate to the ‘Personal’ tab and uncheck the box that says ‘Automatically start the app when I log on to Windows’. Click on ‘OK’ to save the changes.
Following these steps, you can easily disable or completely uninstall Skype for Business from your Windows 10 device.
Now, let’s move on to the next section where we will discuss how to completely uninstall Skype for Business, including any related files or folders that may be left behind.
Completely Uninstall Skype for Business
To get rid of it once and for all, you must wave goodbye to Skype for Business on your Windows 10. Completely uninstalling Skype for Business is a straightforward process that can be done through the Control Panel. Here’s a step-by-step guide to help you remove it from your system.
| Step | Instructions |
| 1. | Click on the Start menu and open the Control Panel. |
| 2. | In the Control Panel, select “Programs” and then click on “Uninstall a program”. |
| 3. | Scroll through the list of installed programs until you find “Skype for Business”. |
| 4. | Right-click on “Skype for Business” and select “Uninstall”. |
| 5. | Follow the prompts to complete the uninstallation process. |
| 6. | Once the process is finished, Skype for Business will be completely removed from your Windows 10 system. |
These steps ensure that Skype for Business is completely uninstalled from your Windows 10 computer. Now, let’s move on to the next section, discussing disabling it via Skype settings.
Without writing another step, you can also disable Skype for Business via its settings.
Disable It via Skype Settings
Let’s explore how you can conveniently turn off Skype for Business by adjusting your Skype settings. First, open Skype for Business and sign in with your account to disable Skype for Business through the Skype settings. Then, click on the gear icon at the window’s top-right corner to access the settings menu.
In the settings menu, navigate to the ‘Personal’ tab and uncheck the option that says ‘Automatically start the app when I log on to Windows.’ This will prevent Skype for Business from launching automatically whenever you start your computer.
You can also disable Skype for Business by adjusting the notifications settings. In the same settings menu, click on the ‘Notifications’ tab. Here, you can customize the notifications for Skype for Business by selecting the desired options. To completely disable all notifications, uncheck the box that says ‘Enable Skype for Business notifications.’ By doing so, you will no longer receive notifications from Skype for Business.
Now that you have learned how to disable Skype for Business through the Skype settings, let’s explore an alternative method using the Control Panel and Registry Editor. This method allows for a more thorough removal of Skype for Business from your Windows 10 system.
Using the Controlpanel & Registry Editor
Navigating through the Control Panel and Registry Editor is like embarking on a digital treasure hunt. You can unearth the hidden pathways to rid yourself of the continued presence of Skype for Business on your computer.
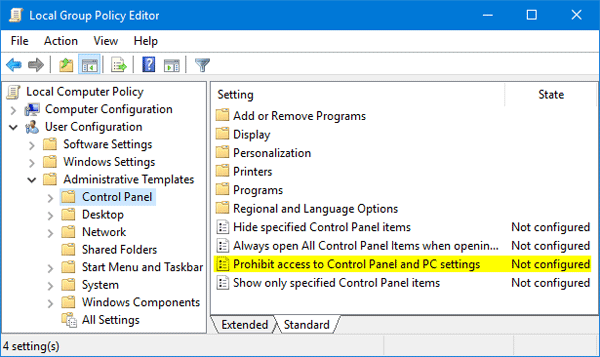
First, open the Control Panel by clicking on the Start menu and typing ‘Control Panel’ in the search bar. Once in the Control Panel, select ‘Uninstall a program’ under the ‘Programs’ category. Scroll through the list of installed programs until you find Skype for Business, then right-click and select ‘Uninstall.’ Follow the prompts to complete the uninstallation process.
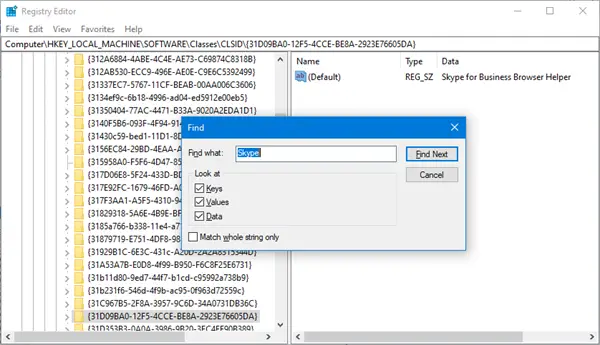
Next, it’s time to dive into the Registry Editor. Press the Windows key + R on your keyboard to open the Run dialog box. Type ‘regedit’ and hit Enter to open the Registry Editor.
Here, you’ll need to navigate to the following location: HKEY_CURRENT_USER\Software\Microsoft\Office\16.0\Lync. Once you’re in the Lync folder, find the ‘EnableSkypeUI’ entry and double-click on it. Change the value from ‘1’ to ‘0’ and click OK to save the changes. This will disable Skype for Business from starting up when you boot your computer.
You can successfully disable Skype for Business from your Windows 10 computer using the Control Panel and Registry Editor. However, to uninstall it completely, you must follow the subsequent section about ‘silent-uninstall using a custom config.’ This method lets you remove Skype for Business without leaving any residual files or settings behind.
Silent-uninstall Using a Custom Config
If you want to effortlessly remove Skype for Business from your Windows 10 computer without leaving any traces behind, try a silent-uninstall using a custom config. This method allows you to uninstall the program in the background without any prompts or notifications. By creating a custom configuration file, you can specify the settings you want to use during uninstallation. This ensures that all components of Skype for Business are removed from your system without any manual intervention.
To perform a silent-uninstall using a custom config, you can follow these steps:
- First, open the Command Prompt as an administrator by right-clicking on the Start button and selecting “Command Prompt (Admin).”
- Navigate to the Skype for Business installation directory by typing “cd C:\Program Files (x86)\Microsoft Office\root\Office16″and pressing Enter.
- Once you are in the correct directory, you can run the uninstallation command with the custom configuration file. Use the following command: “setup.exe /uninstall Lync /config customconfig.xml”(make sure to replace “customconfig.xml”with the actual name of your custom configuration file).
Using a silent-uninstall with a custom config, you can easily remove Skype for Business from your Windows 10 computer without hassle. This method ensures that all traces of the program are completely eliminated, leaving your system clean and free from any leftover files or settings. If you prefer a more automated approach, consider using a third-party uninstaller to remove Skype for Business. This will be discussed in the next section.
Use a Third-party Uninstaller
Suppose you’re looking for a quicker and more efficient way to disable or completely uninstall Skype for Business from your Windows 10 device. In that case, you might consider using a third-party uninstaller. These uninstallers are designed to remove software from your computer without leaving any traces behind. They can help you save time and effort by automating the uninstallation process.
Using a third-party uninstaller is fairly straightforward. Once you’ve downloaded and installed the uninstaller of your choice, open the program and select Skype for Business from the list of installed applications. Then, click on the uninstall button, and the software will take care of the rest for you. It will remove all the files and registry entries associated with Skype for Business, ensuring a complete and thorough uninstallation.
Using a third-party uninstaller can avoid the hassle of manually removing Skype for Business from your Windows 10 device. These tools are designed to simplify the uninstallation process and ensure that no traces of the software are left behind. So, if you’re looking for a quick and efficient way to eliminate Skype for Business, try a third-party uninstaller.
Now that you know how to use a third-party uninstaller to remove Skype for Business from your Windows 10 device, you might wonder how to uninstall it on Windows 11 or 10 without using any third-party tools. Don’t worry, we’ve got you covered! In the next section, we’ll walk you through the steps to uninstall Skype for Business using the built-in uninstallation method.
How Do I Uninstall Skype for Business on Windows 11/10?
To bid farewell to Skype for Business on your Windows 11/10 device, you only need to wave it goodbye using the built-in uninstallation method.
First, go to the Start menu and open the Control Panel. From there, navigate to the Programs and Features section.
Look for Skype for Business in the list of installed programs and click on it. Then, click on the Uninstall button and follow the on-screen prompts to complete the uninstallation process.
Once you have uninstalled Skype for Business using the built-in method, you may still have some remnants of the program left on your computer.
To completely remove Skype for Business from your computer, you must manually remove these leftover files.
Go to the File Explorer and navigate to the following location: C:\Program Files (x86)\Microsoft Office\root\Office16.
Look for the ‘lync.exe’ file and delete it. You can also navigate to C:\Users\%username%\AppData\Local\Microsoft\Office\16.0 and delete the ‘lync.exe’ file in that folder.
By following these steps, you’ll be able to uninstall Skype for Business from your Windows 11/10 device and remove any remaining files associated with it.
Once you have completed these actions, you can learn to remove Skype entirely from your computer.
How Do I Remove Skype Entirely From My Computer?
Get rid of Skype by following these simple steps to ensure it’s completely wiped from your computer.
– Open the Control Panel by clicking the Start button and typing ‘Control Panel’ in the search bar.
– In the Control Panel, click on ‘Programs’ or ‘Programs and Features’ depending on your version of Windows.
– Look for Skype in the list of installed programs and click on it.
– Click on the ‘Uninstall’ or ‘Remove’ button and follow the prompts to complete the uninstallation process.
– Once the uninstallation is complete, restart your computer to ensure all traces of Skype are removed.
After following these steps, Skype should be completely removed from your computer. However, it’s always a good idea to double-check by searching for any remaining files or folders related to Skype and deleting them manually.
You may also want to remove any shortcuts or icons associated with Skype from your desktop or taskbar. Taking these extra precautions ensures that Skype is completely removed from your computer and won’t cause any unwanted interruptions or conflicts.
Frequently Asked Questions
1. Can I Disable Skype for Business Without Uninstalling It Completely?
Yes, you can disable Skype for Business without uninstalling it completely.
To do this, you can go to the Skype for Business application and sign out or go to the settings and disable it from starting up automatically.
This prevents Skype for Business from running in the background without removing it entirely from your Windows 10 system.
2. What Are the Steps to Remove Skype for Business From Windows 11?
You can follow simple steps to remove Skype for Business from Windows 11. First, open the Start menu and click on ‘Settings.’ Then, select ‘Apps’ from the options.
In the Apps settings, click ‘Apps & features’ in the left-hand menu. Scroll down and locate Skype for Business in the list of installed apps. Click on it and select ‘Uninstall.’
A confirmation message will appear, asking if you want to uninstall the app. Click ‘Uninstall’ again to confirm. Windows 11 will then proceed to remove Skype for Business from your system.
Once the uninstallation process is complete, you can close the Settings window. That’s it! You’ve successfully removed Skype for Business from your Windows 11 device.
3. Can I Remove Skype Entirely From My Computer Using the Control Panel?
Removing Skype entirely from your computer using the Control Panel is possible.
To do this, you must open the Control Panel and navigate to the ‘Programs’ or ‘Programs and Features’ section.
From there, you can find Skype in the list of installed programs. Right-click on Skype and select the ‘Uninstall’ option.
Follow the on-screen prompts to complete the uninstallation process. Once the process is complete, Skype will be completely removed from your computer.
4. Are There Any Risks or Side Effects of Uninstalling Skype for Business From Windows 10?
Uninstalling Skype for Business from your Windows 10 computer is like removing a pesky splinter from your finger—it’s incredibly satisfying and will leave you feeling free and unencumbered.
There are minimal risks or side effects when removing Skype for Business. You may experience a sudden increase in productivity, a newfound sense of calm, and a significant reduction in annoying notifications and distractions.
It’s like a weight being lifted off your shoulders, allowing you to focus on what truly matters. So bid farewell to Skype for Business, and embrace a world of uninterrupted workflow and blissful tranquility.
5. Can I Use a Third-party Uninstaller to Remove Skype for Business More Effectively?
You can use a third-party uninstaller to remove Skype for Business from your Windows 10 more effectively.
These uninstallers are designed to remove all traces of the program thoroughly, ensuring a cleaner and more efficient uninstallation process. The standard uninstallation method can help you avoid potential issues or leftover files.
Using a third-party uninstaller ensures a complete and hassle-free removal of Skype for Business from your Windows 10 system.
Conclusion
In conclusion, disabling or completely uninstalling Skype for Business from your Windows 10 computer can be done through various methods. You can start by accessing Skype Settings and disabling it from there. If you want to completely remove it, you can use the Control Panel or Registry Editor to uninstall it.
Another option is to perform a silent uninstall using a custom configuration. Additionally, you can consider using a third-party uninstaller for a more efficient and thorough removal process.
As the saying goes, “Out with the old, in with the new.”Removing Skype for Business from your Windows 10 computer can help streamline your communication tools and make way for newer, more efficient alternatives. Whether you prefer to disable or completely uninstall it, these methods will ensure that Skype for Business is no longer a part of your system.
So, take the necessary steps to bid farewell to Skype for Business and embrace the future of communication on your Windows 10 device.